Friday, June 14, 2013

"The Cheesehead" Grilled Cheese

I couldn't help myself. I had to do it again. I accomplished another restaurant remake from the local Shelby Sports Club. They have a grilled cheese sandwich like no other....The Cheesehead.

I put my Chipotle-Garlic Mayonnaise to good use when making this sandwich because the components of the sandwich include 3 types of cheese, tomato and chipotle mayo. This all makes for a fan-freakin-tastic grilled cheese sandwich I tell you what! Way better than just your typical american cheese slices slapped between two slices of bread.

I gotta admit, this is a ridiculous amount of cheese, but it's so good! It wouldn't be a "cheesehead" without tons of cheese. I just love how the cheese oozes out....mmmm. Total comfort food.

To make this ultimate cheesy grilled cheese, you are going to need to gather your supplies:

Bread, Tomato, Chipotle-Garlic Mayonnaise, American Cheese slices, Cheddar Cheese, Mozzarella Cheese and of course, Butter!

Then it is time to assemble!

It's very important that you do it in this order:
1. Slice of Bread
2. 1/2 tbsp Chipotle-Garlic Mayonnaise
3. 1/4 cup Shredded Cheddar Cheese
4. 1 Slice of American Cheese
5. 2 Slices of Tomato
6.1/4 cup Shredded Mozzarella Cheese
7. Top it with another slice of bread with 1/2 tbsp chipotle-garlic mayonnaise spread all over. 

Then spread the bread slices with some butter like you would for any other typical grilled cheese and cook for 1-2 minutes per side! Eat and then go work out. You are going to need it after consuming this spicy cheesy goodness. At least there is a tomato on it, right? That counts for something!

Wednesday, June 12, 2013

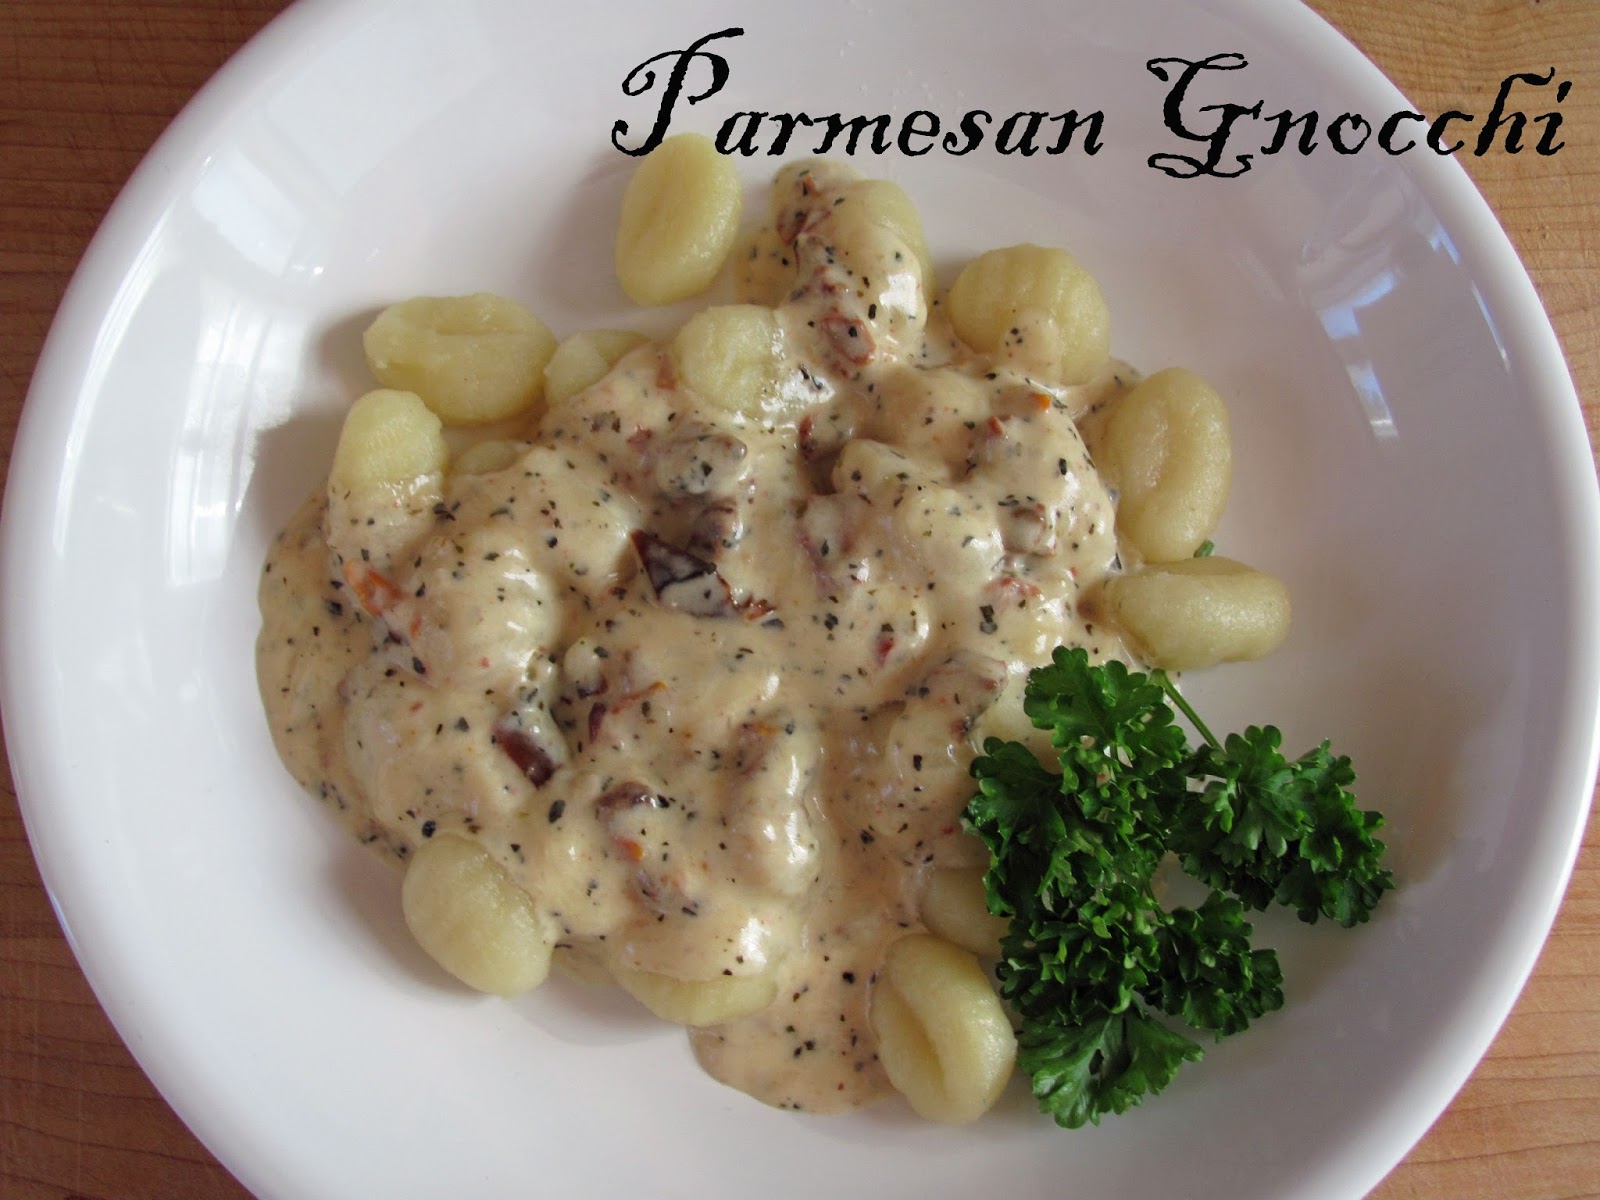
Parmesan Gnocchi

This recipe has been a long time coming. In fact, I've been meaning to create this recipe since February when I first encountered Parmesan Gnocchi at one of my favorite restaurants in Billings, The Granary.


My parents came to visit us in Billing for Shrek: The Musical back in February and before the show we went to dinner at The Granary. We don't usually order appetizers, but one of my nursing classmates was working there that night and convinced us that the Parmesan Gnocchi was pretty spectacular. We agreed and the next thing we knew a large rim bowl was brought to our table with beautiful gnocchi dumplings swimming in a pool of the most wonderful cream sauce. The gnocchi was gone in seconds between the five of us at the table and we then started dunking our slices of bread in the sauce to savor every last drop. The next morning we drove over to World Market and loaded up on gnocchi (I should have bought more!) so we could try recreating it ourselves.

The funniest part was my dad couldn't quite grasp the pronunciation of gnocchi. It's really pronounced noh-kee, but my dad kept calling it nookie. You know, like the stuff done behind closed bedroom doors! My dad was telling everyone that night "how much he loves nookie" and we were all laughing hysterically. It's now become the family joke and gnocchi will never be pronounced the same among us.

After all this time, the packages of gnocchi we bought back in February have been sitting in my pantry calling my name. The other night I finally decided to give it a go and try to recreate that marvelous parmesan cream myself. To my pleasure and excitement, I replicated the cream sauce perfectly! Now that I don't live in Billings anymore I can have Parmesan Gnocchi here in Chester!

Parmesan Gnocchi
{Serves 4}

-16 ounce packaged Potato Gnocchi
-2 tbsp Butter
-1 cup Whipping Cream
-1/2 tsp Salt
-1/4 tsp Pepper
-1 tsp dried Basil or 1 tbsp fresh basil minced
-2 tbsp Dried Sun-Dried Tomatoes re-hyrdrated and minced
-1/2 cup freshly grated Parmesan Cheese

Cook gnocchi according to directions on package. Drain and set aside.

Heat a large saucepan over medium heat and melt the 2 tbsp of butter. Once melted, add the cream, salt and pepper. Stir to combine and bring the sauce to a boil, then reduce heat. Stir frequently while the sauce gently boils and thickens for 3-5 minutes. Add the basil and sun-dried tomatoes to the thickened sauce and heat through for 1 minute over low heat. Remove the saucepan from heat and stir in the 1/2 cup freshly grated parmesan cheese. Place the gnoochi on a serving dish and pour the sauce over top. Enjoy!

Recipe Inspired & Adapted By: The Granary & Anyone Can Cook

Monday, June 10, 2013

Dobie Love: 2 Weeks with Duke

I'm going to apologize in advance. Actually, I'm not going to apologize, I'm going to warn you. For the next 10-15 years every aspect of The Girly Girl Cooks (Twitter, Instagram & Facebook) is going to be flooded with pictures and posts featuring my new baby pup.


Duke has brought so much joy into our lives. In fact, we can't imagine life without our ginormous puppy. Living in a small town, Duke has easily become the town celebrity in just 2 weeks. I guess there aren't many doberman pinschers in a small farming community! Therefore, it has been both Dusty and my mission to take Duke around town and introduce him to everybody to break the doberman pinscher stereotype.

This is definitely the face of a killer. Right???

Duke is definitely a lover and not a fighter. He's a total momma's boy and everyone he encounters gets smothered in puppy kisses. He definitely is winning the hearts of the community. My favorite is when he encounters little kids. His little nubbin of a tail goes crazy and he attacks the kiddos with kisses. It makes a puppy momma's heart melt. 

One of the biggest adjustments to being a puppy parent is sleeping. Or should I say lack of sleeping? Duke wakes us up about 1-4 times a night. On a good night he will let us sleep 5-6 hours at a time and on the nights when he gets a chicken-liver puppy treat, he wakes me up every 1-1/2 hours (that was a really rough night!). Let it be known...Duke does not eat chicken-liver puppy treats anymore because it doesn't agree with his bowels and I need sleep. 

Giant puppy paw!

The greatest puppy parent achievement Dusty and I have accomplished so far is that we have pretty much mastered potty training with Duke! He hasn't had an accident since last Monday and it was most likely due to the pouring rain outside, and Duke is not a fan of doing business in the rain. 

Other than that, we have been accident free! At night when he needs to go to the bathroom he gives a little whimper from his crate and I let him outside. Then during the day he will go stand by the door and make a little noise to let me know he is ready for business. Such a smart pup! Now if we could just get over the teething stage. My jeans and sandals are getting waaay too much love from Duke. 

Another thing....Duke has the weirdest sleeping habits and will sleep on anything and everything. He likes to sleep on his doggie bed with his toys....


On the couch....

On our shoes???

And my personal favorite. 
This is usually how I find him asleep in his crate...
Such a goober!

As people who are losing sleep as it is with our new pup, Dusty and I were determined that Duke wouldn't sleep or be on our bed. It's fun and cute when he is a 17 pound puppy, but once he reaches 90-100 pounds there isn't going to be room for us in the bed! Well, as you can see, we gave in....
So now Duke can add this to his list of many places to sleep.
I am weak to those puppy eyes.


On Saturday Dusty and I took our once a month trip to the "big city" of Great Falls to stock up on home/food supplies. 25 pound bag of flour and rice for $9 each. Heck yes! We brought Duke with us and of course we had to take him to the city dog park.


Duke hasn't really had the opportunity to socialize with other dogs before, so we were anxious to see how a park with 20-30 dogs would go....

And it went wonderfully!

Duke and this one chocolate lab became best friends instantly. They were rolling around in the grass and slobbering all over each other. Then a german shepherd had to come check out the situation....and apparently Dukes situation too. Dogs....


One of Dukes favorite things to do at the park was to run back and forth to Dusty and I through a giant tunnel. He loved it!

After an hour or so of playing at the park, Duke was pooped out and hot. We drove over to Petco so he could pick out a special treat (because he isn't spoiled enough!). His first choice was this furry squeaky squirrel...
Can I pweaz haz it? I waz a good boy today!

Of course we bought the squirrel. How can you refuse those eyes and soft velvet ears??? On the way home he slept throughout the entire car ride like a good boy. He especially loved laying on his ice pack. I found these giant ice packs at the grocery store and they are perfect for keeping your pup cool on hot days in the car. 


On Tuesday Duke will be 9 weeks old. They grow up so fast!  Each Tuesday I'm going to weigh him and take a picture of him. It will be fun to see how fast he grows from week to week. In just one week, he had already gained 3 pounds, so I'm curious to see how much he gains this week. I'll keep you posted!


Thursday, June 6, 2013

Chipotle-Garlic Mayonnaise

It's funny how over the years our taste buds evolve. I can distinctly remember eating plain white turkey breast and mashed potatoes as a young girl at Thanksgiving. How boring is that? I also remember ordering just a chicken taco with cheese and lettuce whenever we would go out for Mexican with my family too. Totally bland.

Now I've gotta have heat! I've gotta have flavor! The more flavor the better. I find myself mixing Frank's Red Hot Sauce and Tobasco on everything. I can't just have Ranch dressing anymore, I've gotta have it mixed with Frank's. Hashbrowns and eggs can't be left alone, they have to have dashes of Tobasco everywhere. It's become an addiction.

So of course through natural progression I had to move onto altering mayonnaise! Instead of just chopping up some chipotle peppers in adobo sauce and adding it to my mayo like I've seen in so many recipes, I took it up a notch and added some really fun flavors to make something really wonderful.

This mayonnaise is insanely good. I've been putting it on everything. I feel like that sassy old lady from the hysterical Frank's Red Hot sauce commercials who "puts that s*** on everything". You know what I'm talking about! I'm putting this mayo on everything. My sandwiches will never be the same. In fact, next week I'm going to use this flavor-packed mayo to show you how to make the ultimate grilled cheese. Get excited!

To make the Chipotle-Garlic Mayonnaise, it only takes 5 ingredients and less than 5 minutes! It just takes lemon juice, garlic, mayonnaise (the real stuff, not the fake nasty Miracle Whip), chipotle peppers in adobo sauce and parsley. 

Place all the ingredients in your mini-food processor...

And let it go for 5-10 seconds until it resembles this gorgeous creation!

That's it! Super simple and easy. The next step is to spread it on everything from your favorite sandwich (maybe not PBJ...that might be weird) to tacos, burgers and salads. Feel free to play around with the spiciness of this mayo. I find that 1 chipotle pepper per 1/2 cup mayo is perfect, but you can always add more or use less. It's up to you!

Chipotle-Garlic Mayonnaise
{1/2 cup}

-1/2 cup Mayonnaise
-1 tsp Lemon Juice
-1 clove Garlic
-2 tbsp Parsley
-1 Chipotle Pepper in Adobo Sauce (seeds removed)
-1 tsp Adobo Sauce from Chipotle Peppers

Combine all ingredients into a mini-food processor. Pulse ingredients for 5-10 seconds until combined. Place in an air-tight container and store for 7-10 days or serve immediately. 

Enjoy!

Thursday, May 30, 2013

Caramelized Pineapple Ice Cream Sundae

Since I started this blog 3 years ago yesterday (Yay! Happy Anniversary!), I have been collecting recipes and compiling them into a giant binder so I have all of my favorite recipes in one place. Every couple of months I sit down and clip out the most intriguing recipes from my favorite food magazines and add them to the collection. If I didn't do this I would have piles upon piles of magazines stacked up everywhere because I have a food magazine problem. I'm addicted to them!

I was flipping through my binder this afternoon and found a recipe for a pineapple ice cream topping that I had saved from one of the many many foodie magazines I've had in my magazine rack. Since it has been raining non-stop for over 24 hours, I needed a little bit of tropical flavor in my life to brighten the gloomy mood of the constant rain. Plus I needed to break in my brand new pineapple corer/slicer gadget thingy that I had just purchased recently. It is amazing by the way! How have I lived without this little doohickey in my life???? 


So just after coarsely chopping up the fresh pineapple, mixing it with 5 simple ingredients and broiling it for 8 minutes...


I discovered an amazingly sweet, fruity and unique ice cream sundae topping that I absolutely love! 

Forget the boring old chocolate and caramel sauce the next time you sit down with a big bowl of ice cream. You gotta try this caramelized pineapple topping with your favorite vanilla ice cream! This sundae topping would also be awesome with some plain/vanilla yogurt for breakfast too. YUM!

Caramelized Pineapple Ice Cream Sundae
{Serves 4}

-2 cups coarsely chopped fresh Pineapple
-3 tbsp Dark Brown Sugar
-3 tbsp fresh Orange Juice
-1/2 tbsp Honey
-1/2 tsp Ground Cinnamon
-1/2 tsp Ground Ginger
-Vanilla Ice Cream

Preheat the broiler to High and place the oven rack on the highest level, closest to the broiler. Line a baking sheet with foil and grease with cooking spray. 

In a medium bowl add the dark brown sugar, orange juice, honey, ground cinnamon and ginger. Whisk to combine. Add in the pineapple to the mixture and toss to coat. Spread the pineapple mixture onto the baking sheet and broil for 5-8 minutes until golden bubbly. Remove the caramelized pineapple topping and spoon it over your vanilla ice cream. 

Enjoy!
Recipe Inspired By: Cooking Light 

Tuesday, May 28, 2013

Casserole Baked Chiles Rellenos

Every morning, Monday through Friday, I get up with Dusty and make him breakfast before he heads off to work for the day. I've been trying to get creative with my breakfast dishes and not get stuck in the rut of making the same old over-medium eggs with toast everyday. I was browsing through my recipe index for some inspiration and found my recipe for Chiles Rellenos.


It's funny how you make something so long ago and forget how good it is. This is definitely the case with this casserole baked version of chiles rellenos. As much as I absolutely love chiles rellenos, I'm surprised I haven't made the tradition version yet with the poblano pepper stuffed with cheese and dipped in the egg batter. I'll just have to add it to my to-do list! 

When I made the chiles rellenos this morning I upgraded them a bit from when I first made them in my original blog post a couple years ago. Instead of serving them as is, I placed it on top of some buttered toast and added a dollop of sour cream and salsa. This made the chiles rellenos SO MUCH BETTER! It took the already delicious casserole baked chiles rellenos to a whole other level

You gotta make this for breakfast! You just gotta! 

For the in-depth, step-by-step tutorial of how to make the casserole baked chiles rellenos, you can visit my original blog post by clicking on the link HERE. Just remember you gotta serve it on a slice of buttered toast with salsa and sour cream to make it awe-some!

Casserole Baked Chiles Rellenos
{4 Servings}
-5 Whole Roasted Green Chiles
-1 cup Cheddar or Monterey Jack Cheese
-3 Eggs
-1 cup Milk
-1/4 tsp Smoked Paprika
-1/8 tsp Cayenne Pepper
-1/4 tsp Kosher Salt 
-1/8 tsp Pepper 
-Toast, Sour Cream, Salsa and Cilantro (for serving)

Preheat the oven to 375 degrees (F) and grease a 8x8 baking dish. 

Lay your whole roasted green chile peppers on a cutting board and slice them in half. Pat them dry with a paper towel. Lay a layer of 5 chile halves and sprinkle 1/2 cup of cheese. Repeat with another layer of chiles and cheese. 

In a bowl, mix together the eggs, milk, smoked paprika, cayenne pepper, salt and pepper. Pour them over the chiles in the baking dish. Place the baking dish into a rimmed baking sheet and fill it with 1/2 inch of water in the oven. Bake for 35 to 40 minutes until the chiles rellenos are completely set. Cut into 4 servings and serve on top of buttered toast and finish with sour cream, salsa and fresh cilantro. Enjoy!
Inspired by: The Pioneer Woman

Sunday, May 26, 2013

Meet Duke


I'd like to introduce you to Duke. He is 6 week old black and tan doberman pinscher that has quickly become the second love of my life. Duke was born April 9th and is already 15 pounds of cuteness at just 6 weeks, 4 days old. He has puppy breath, velvet soft ears and paws that smell like fritos. I'm in love. 

Here he is at 20 days old.
Such a little chunk!
I sent this picture to my parents to surprise them with their new grand-puppy!

Dusty has always wanted a doberman since we have started dating and when we found the ad for Duke in the newspaper at the end of April, we knew we had to have him! He was the only black and tan male in a litter of 3. He was such a chubby baby! 

Last week when Dusty and I were at the administration conference, I got a call from the breeder and they said that he had become HUGE! She told me I couldn't believe how big he was compared to his other siblings. She said he was the size of a 10 week old puppy at only 5 weeks. I needed photo evidence and this is what I got in my email...
That is one big puppy!!!
Look at the paws on that little guy! He is going to be at least 90 pounds of fun, just like his daddy. 

So after a month of waiting and more waiting, we finally got to meet our baby Duke in Helena yesterday. The moment we met Duke, we instantly fell in love!

We drove home after getting him and we were so surprised he slept the entire 2-1/2 hours of the trip. He was so excited when we got home because we had tons of toys waiting for him and a yard to play in. Duke settled into his new digs instantly. When bedtime came, I didn't know exactly what to expect with it being his first night away from home, but he did fantastic! He would yelp when he had to potty every 3-4 hours and didn't have any accidents.....so proud!

Besides having his crate that he uses for sleeping at nighttime and for travel, he absolutely loves the giant soft bed we got him from Costco. I can't get him out of it this morning! He dragged all of his toys up onto his puppy bed and has been lounging and playing all morning. 

I'm in love with this little guy!

Friday, May 24, 2013

Creamy Garlic Margarita Pizza

I have something embarrassing to confess. Up until high school, I use to eat pizza like a complete weirdo. Whenever my mom would make her fantastic homemade pizza on Friday nights, I would scrape off all the cheese and toppings. Then I would eat the pizza crust alone with a fork, and follow by eating the cheesy toppings separately. I don't even know why I did it and when I stopped doing it, but I'm glad I did because pizza is so much better when all of it's components are combined together in pizza goodness!

Although, I do still eat pizza with a fork. Please don't judge me.

One of my favorite pizza's of all time is a classic margarita pizza. Nothing beats the simplicity of mozzarella, basil and tomatoes on a golden crispy pizza crust.


What makes this pizza extra special and out of this world is my creamy garlic sauce. My first job right out of high school was working at a pizza place and this sauce has stuck with me ever since. I love everything about this pizza, especially with the summer arriving bringing its fresh herbs and produce. 

Change up this weekends pizza night with a creamy, gourmet pizza that your family will absolutely love. You might even want to make two pizza's because it is that good! I bet you can't stop at two slices!


My Mom's Classic Pizza Crust
{Makes 1 Large Pizza}

-2 cups All Purpose Flour
-2 tbsp Extra Virgin Olive Oil
-1/2 tsp Kosher Salt
-1 tbsp White Granulated Sugar
-1 packet Yeast
-3/4 cup Warm Water
-Olive Oil 
-Cornmeal

Preheat the oven to 175 degrees (F) and then turn off the oven. This will create the perfect "warm environment" for the dough to rise. Combine all the ingredients (flour to warm water) in a mixer over medium-low speed until smooth and elastic. Place approximately 1 tsp of olive oil in the bottom of a glass bowl and coat the dough and bowl with the olive oil so that it doesn't stick to the sides as it rises in the oven. Cover the bowl with plastic wrap and place it in the oven to rise for 1-2 hours. Once risen, sprinkle some cornmeal onto your countertop and roll the dough out to fit your pizza pan. 

Creamy Garlic Sauce
{Makes 1 cup Sauce}

-1 cup Ranch Dressing
-3 cloves Garlic (1-1/2 tsp minced)
-1 tbsp Italian Seasoning

Add all the ingredients to a small bowl and stir to combine. Spread on your pizza!


Creamy Garlic Margarita Pizza
{Makes 1 Large Pizza = 8 Slices}

-1 recipe of Mom's Classic Pizza Crust
-1 recipe of Creamy Garlic Sauce
-8 ounces grated Mozzarella Cheese
-6 fresh Basil Leaves-chiffonade
-1 Roma Tomato-thinly sliced
-Olive Oil (cooking spray)

Preheat the oven to 450 degrees (F). Arrange the prepared pizza crust on the baking pan and evenly spread the creamy garlic sauce leaving a border for crust. Sprinkle the grated cheese evenly over top the sauce, followed by arranging the thinly sliced tomatoes and chiffonade basil leaves.

Using a misto filled with olive oil, spray the crust with the olive oil. This will make the crust golden brown. Place the pizza in the oven and bake for 12-15 minutes until golden brown. Once the pizza is done baking, switch the oven over to "broil" mode and let the cheese get bubbly and slightly burnt/browned from the broiler for 1-2 minutes. Remove the pizza from the oven and slice up into 8 equal slices.

Enjoy!

Thursday, May 23, 2013

Perfectly Baked Bacon

Living in a small town with a small grocery store can be a challenge for a lover of food and food blogger. The produce at the grocery store is ah-mazing and fresh, but good luck finding specialty items! I've quickly learned how to become creative with ingredient substitutions and how to create my own ingredients on the fly.

For example, I made an awesome recipe from my Picky-Palate cookbook requiring a Hidden Valley Ranch Seasoning packet. Apparently in Chester those little packets of seasoning don't exist, so I had to do some googling and searching to make it myself. Another example is marsala wine. I'm going to need to stock up on TONS of my favorite marsala cooking wine next time I go to the "big city" because that doesn't exist either. Sherry? yes. White wine? yes. Red wine? yes. Marsala? nope!

That's okay...I've got a list a mile long of my favorite things I need to get in Great Falls. It's a small price to pay for living in such a wonderful community and plus it challenges me and makes me get really creative in the kitchen.

Although pancetta and proscuitto may not be available, one thing that you can always count on is LOTS of bacon. There will never be a shortage of bacon in Chester because they have tons of it and in lots of different varieties. Personally, my favorite is the reduced-sodium smoky variety (just in case you were curious).

I always thought my Dad was the king of making bacon. He would always tell me "go low and slow" when pan-frying for the perfect bacon. Being very impatient and wanting bacon ASAP (who doesn't???), I always burned it and would somehow always get burned from the splattering grease. After years of burning bacon and myself, I discovered BAKING BACON!


Have you tried it before? 

It's ridiculously easy and no one gets burned! BONUS! The bacon turns out perfect EVERY. SINGLE. TIME. It's revolutionary. You will never want to pan-fry bacon ever again once you bake your bacon.

Perfectly Baked Bacon
Preheat the oven to 400 degrees (F). Place a wire (cooling) rack on top of a large baking sheet. Lay the slices of bacon on the wire rack. Once the oven is preheated, place the baking sheet with the bacon in the oven for 15-25 minutes (depending on bacon thickness and desired crispiness). After the bacon has reached its desired crispiness, remove the bacon with tongs to a plate with paper towels to remove excess grease.

Oh yeah, baby. Gimme some bacon. 

So now that you have some perfectly baked bacon, why not make the perfect BLT sandwich while you are at it?  All you gotta add is some toasted bread, lettuce, tomato and mayo to the mix for a simple and delicious sandwich that always hits the spot. 


I know this is a simple post with nothing too complex or fancy. But I wish someone had told me years ago about baking bacon. It could have saved me from a lot of grease burns! So I'm telling you now....bake your bacon!
Related Posts Plugin for WordPress, Blogger...