Saturday, February 12, 2011

Just a Little Sneak Peak....

Can you guess what I'm making Dusty for Valentine's Day???
I'll give you some hints with the following foods....

Panko Bread Crumbs, Shredded Coconut and Lemongrass

Mixed Greens

Oranges, Limes and Lemons

Carrots

Avocado

Heavy Cream (of course!)

Passion Fruit Juice
Have you figured it out yet???

Small Loaf of Crusty Sour Dough Bread
(Hint: Croutons)

Prawns

Scallops

And of course White Wine to enjoy with our dinner!

Have you figured it out yet?!?!?!?

You will just have to wait to find out!

Thursday, February 10, 2011

Chicken Verde Enchiladas

This dish has a lot of meaning to Dusty and I. It was the first dinner we made together the first night of moving into our new apartment. We were so excited that night because our new oven wasn't going to catch on fire, the fridge/freezer was going to keep things at its proper temperature, and we had a dishwasher too!

It's funny how the little things matter so much.

Dusty's old apartment was an absolute nightmare. Like I said, the oven and stovetop caught on fire everytime I turned it on. The fridge was from the 1980's (or older) and would make milk go bad in 2 days! I'm surprised that Dusty didn't die of food poisoning or some nasty bacterial disease because I saw things in that fridge that I could have used in my Microbiology Lab. I probably could have made a discovery of a new species of bacteria if I had investigated the growth occuring in his fridge!

Oh yeah, and he didn't have a dishwasher which meant that he and I have washed many dishes by hand. I love my dishwasher sooooo much!

Needless to say, having our new apartment with it's small but new kitchen is awesome!
This is what it looked like when we first moved in.
After a trip to Crate and Barrel, Pier 1 and such, it is fully decked out in cute kitchen gadgets now!


Here is what you are going to need for Chicken Verde Enchiladas:
-1 large can of White Chunk Chicken Breast (in water)
-1 (10.75 oz) can of Cream of Chicken
-1 cup Sour Cream
-1 cup shredded Monterey Jack Cheese
-1 pouch of Uncle Ben's Spanish Style Ready Rice
-1 ear of shucked Corn
-1 medium Yellow Onion-chopped
-1 (19 oz) can of Verde Enchilada Sauce
-1 cup of Mexican Blend Cheese
-6 to 8 Burrito Sized Flour Tortillas

First preheat the oven to 350 degrees and grease a 9x13 baking dish.

Take your corn and remove the corn kernals off of the corn. I saw this trick on Rachael Ray where she put a small bowl upside down in the large bowl and it really helps!

Then add your Chicken.

Chop your onion and add it too!

Don't forget to add the Cream of Chicken to the party!
By the way, Cream of Chicken looks really freaky!
Why is it so yellow?!?!?

Heat up your Spanish-Style Ready Rice according to the package (about 90 seconds) and toss that in too.
This dish is definitely not fancy or made from scratch by any means. But it is good for any weeknight when you just need something comforting with some Mexican flair!

And last but not least, don't forget to add the Sour Cream and Monterey Jack Cheese!

Mix all the ingredients together...

And place giant scoops (about 1/3-1/2 cup) of the mixture onto your Burrito Sized Tortillas.
Fill them as full as you want and roll them up as shown....
I work at the grill of my campus country store, so I'm pretty much a burrito folding expert.
Watch my skills!

This was really difficult to do one-handed!


Ta-da!!!

Place the folded enchiladas into the greased baking dish and pour the Verde Enchiladas Sauce over top of them.


And then sprinkle 1 cup of Mexican Blend Cheese on top!

Then bake the enchiladas for 45 minutes until they get hot and bubbly.
Enjoy!!!!

Monday, February 7, 2011

Cheeses for Sweet Valentine's Treat

On Friday, Dusty and I kicked off the Valentine season by going to cooking class at the Good Food Store here in Missoula. Except it wasn't a normal cooking class, it was a cheese tasting!
I was in heaven!

The purpose of the class was to introduce us to some uncommon cheeses and how to pair them with different foods, beverages and how to make desserts using Goat Cheese.  Dusty and I had a blast and will be returning for next month's class because it was only $5 per person, which makes for a perfect date!

Since I love you all, I wanted to share a little bit of the knowledge I learned on Friday and what all we tried!

The first cheese we tried was the St. Andre, French Triple Cream Cheese....
The St. Andre cheese originates from France and is almost a Brie-like cheese. Super creamy and super rich! This cheese is best paired with a fruit paste (pear, fig or apple) and crackers. Sparkling wines are the best beverage to enjoy with this cheese.

The next cheese we tried was one of Dusty and my favorites, Parrano Gouda....
The Parrano Gouda originates in Holland and is a really versatile cheese. It has a great nutty flavor and pairs perfectly with Olives. I loved Gouda already and this one was divine!

The third cheese we tried was our absolute favorite, I might have gone back for seconds! This cheese is the Manchego cheese.
This is apparently the most popular cheese in Spain and I can see why! It melts in your mouth and has the consistency of parmesan cheese, kinda. It's hard to describe, but we loved it! It pairs best with a fig, pear or apple and a Spanish Red Wine as a beverage. I LOVE THIS CHEESE!

The last cheese we tried was different. We were warned that this cheese is stinky and boy is it stinky! This is the Cowgirl Creamery Red Hawk Cheese.
This cheese is made by the Cowgirl Creamery out in California and interestingly, the milk to make the cheese comes from an organic dairy in Marin, California. It's a wash-rind cheese and has a very unique and complex flavor. I didn't really know what to think about it because it was so different. I have never had anything like this before. It is also a triple cream/brie-like cheese and pairs well with a Hard Apple Cider. This cheese is so complex, the cheese buyer for the Good Food Store didn't know what food to pair it with. This is really a unique cheese!

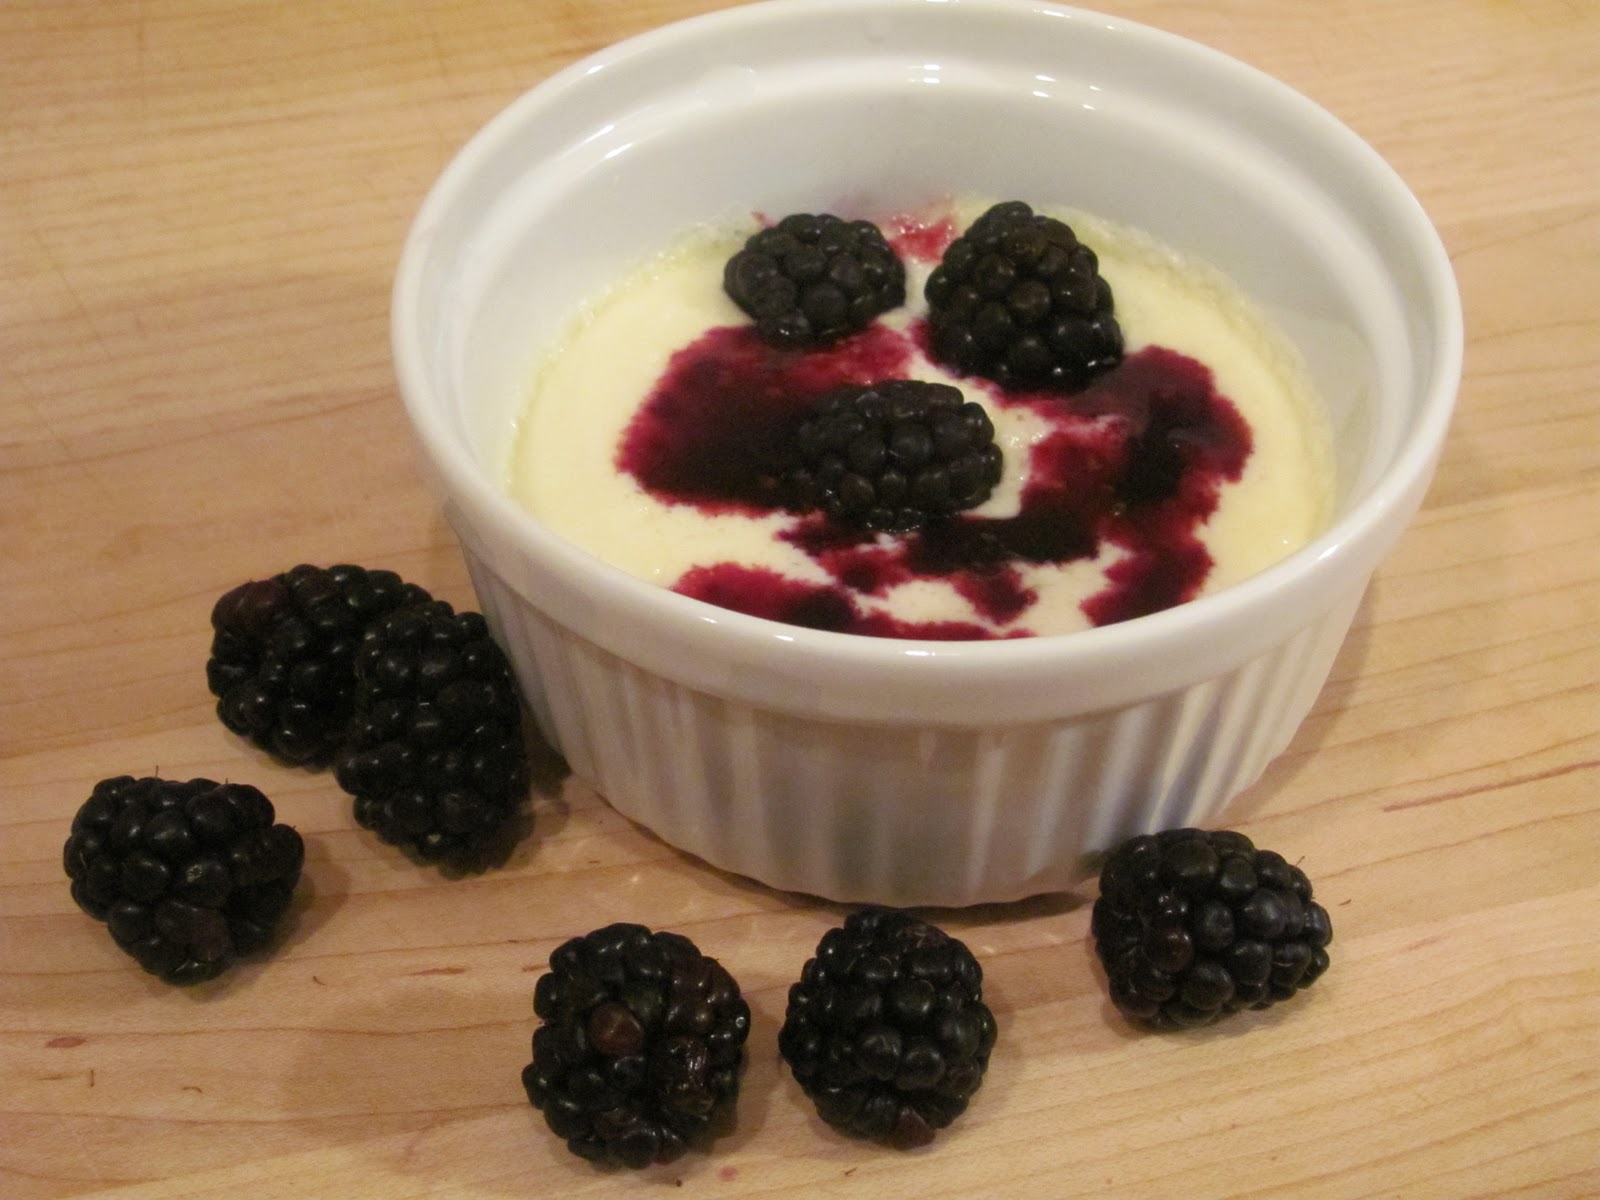
And because I love you all so much, I'm going to share with you the most unique and great tasting dessert I've ever had! This was given to us by the dessert chef at the Good Food Store and it's all I've been able to think about since Friday. I tweaked the recipe a bit because it originally calls for cherries for the sauce, but I was feeling rebellious and wanted to use Blackberries. But you can use any berry you want: cherry, raspberry, blackberry, blueberry or huckleberry!

Goat Cheese Custard with Sweet Blackberry Red Wine Syrup

Here is what you are going to need for the Goat Cheese Custard (for 2 servings):
-2.5 oz of fresh Goat Cheese at room temperature
-1/8 cup Sugar
-1/4 cup Heavy Cream
-1 Egg Yolk
-1/4 tsp Vanilla Extract

First preheat the oven to 350 degrees and place 2 ramekins into a baking dish.

In a bowl, blend together all the ingredients until smooth for about 30 seconds with an electric mixer.

Divide the custard into each ramekin and fill them about a little over half full.


Create a water bath by add hot water to the baking dish and filling it up until it reaches half way up the ramekins. Cover the pan with foil and bake for 20 minutes.
When the custards are done, remove them from the baking dish and let them cool completely. Chill them in the fridge for up to 2 days covered in plastic wrap.

For the Sweet Blackberry Wine Syrup:
-1/4 cup Red Wine
-1-1/2 tbsp Sugar
-1/4 cup fresh or frozen Blackberries-slightly mashed with a fork
In a saucepan, cook the red wine, sugar and blackberries until it thickens to a syrupy consistency. Remove it from the heat and allow it to cool completely before serving on top of the Goat Cheese Custard.

Have you ever seen anything so divine? So easy, so creamy, so delicious!

If this class weren't fun enough already with all the delicious cheeses and desserts, we even got a goodie bag to take home with us!

We got samples of the St. Andre and Gouda, plus some Olives!
Have I ever mentioned how much I love cheese?!?!?
I've pretty much decided that becoming a Cheese Buyer is my new career goal...forget Nursing!
Just kidding!
But seriously, that has to be the best job EVER!

Thank you Good Food Store for all the fun information on cheese and desserts with cheese, we had a blast!
I can't wait for Tuesday's cooking class, it's going to be so much fun!

Sunday, February 6, 2011

English Muffins

Because Dusty and I are such party animals, we did something wild and crazy for our Saturday night.....we made English Muffins. Yeah, I know. Kinda lame. But hey, it was fun to bake together and they turned out delicious!

Here is what you are going to need for 10 English Muffins:
-1/2 cup Milk
-1-1/2 tbsp Butter
-1 tbsp Sugar
-1/2 cup Warm Water
-1/2 package of Dry Active Yeast (1/8 oz)
-1/8 cup Cornmeal
-2-3/4 cup Flour (plus more for kneading and rolling dough)
-1/2 tsp Salt

In a saucepan, combine the milk, butter and sugar over medium heat. Warm until the butter melts, whisk briefly and then remove the saucepan from heat and let it cool to lukewarm.

In a large bowl, pour in the warm water and sprinkle the yeast on top. Stir the yeast around with a fork and set the yeast aside for 10 minutes until the yeast dissolves into the water.

Meanwhile, while you are waiting for the milk mixture to cool and the yeast dissolve, cover a baking sheet with wax paper and generously sprinkle with cormeal.

Pour the milk mixture into the large bowl of yeast mixture and stir to combine. Add 1-1/2 cups of flour and stir vigorously until the batter is smooth. Then add the rest of the flour (1-1/4 cup)  and the 1/2 tsp of salt. Stir until the dough is no longer sticky. Place the dough onto a floured surface and flour your hands so they don't stick to the dough. Knead the dough for 3-4 minutes and then let the dough rest for 5 minutes, because it's tired from you working it so hard ;)

Roll the dough out to 1/4 to 1/2 inch thickness and cut the dough into circles using either a biscuit cutter or you can even use a drinking glass. Place the muffins onto the baking sheet and sprinkle more cornmeal on top of each muffin. Cover the muffins with a clean towel and allow them to rise for 1-2 hours.

*Dusty and I thought it would be a good idea to let them rise overnight. After rising for 2 hours they were huge and beautiful, we were so excited! But then they deflated overnight and weren't as puffy as they were before. So make them the morning of, not the night before. Those are my words of wisdom!

After the muffins have risen to their puffy gloriness, heat a skillet over medium heat. Using a spatula, carefully transfer half the muffins to the ungreased skillet (so they don't loose shape) and bake for 8-10 minutes on each side. Flip the muffins over with a spatula. Repeat with the other half of muffins and transfer the cooked muffins onto a cooling wrack to cool.
Split them in half and toast them in your toaster so you can enjoy them for breakfast! Dusty said, "It's not an English Muffin until it's completely smothered in butter!" and I have to agree! I also love having some Huckleberry Jam on mine too!
I'm so glad I tried this recipe from the TK Blog! Gotta love Tasty Kitchen!

Saturday, February 5, 2011

Coconut Macaroon Brownies

The other night I was in the mood for Coconut Macaroons and Brownies, but I couldn't decide which to make! So you can't imagine how excited I was when I found this recipe from creationsbykara on Tasty Kitchen the other night. It's the best of both worlds put into one delicious bar!

Here is what you are going to need for the Brownies:
-3/4 cup Butter
-1-1/2 cup Sugar
-1-1/2 tsp Vanilla
-3/4 cup Cocoa
-3 Whole Eggs
-1-1/2 cup Flour
-1 tsp Salt

For the Filling:
-4 cups Coconut
-14 oz Sweetened Condensed Milk
-1 tbsp Vanilla
-1/4 tsp Salt

This recipe is super easy!!!
In a bowl, mix butter, sugar, vanilla, and cocoa. Whisk in the eggs until combined. Stir in the flour and salt. Spread half of batter in a greased 9×13 baking dish. Combine all filling ingredients in a mixing bowl and spread it completely over the brownie batter. Drop remaining batter over the filling in spoonfuls, then spread out evenly over the filling. Bake at 325 degrees for about 40–45 minutes until the toothpick is just clean. Allow to cool for 10 minutes before cutting into and enjoying!

On a side note, last night after coming back from my cheese tasting class (amazing details to come later), I checked my email and found out that received the Blog Star Web Award for having the following:
1.) Quality Web Content
2.) Great Design
3.) Web Blog That Everyone Will Love To Read

I was so excited and honored to receive the Blog Star Web Award!
Thank you so much AddYourBlog.com!!!


Friday, February 4, 2011

First Guest Post!!! Wanna Be A Country Cleaver's "Gimme S'mores Cupcakes"

I'm so excited to introduce you all to my awesome bloggie friend Megan from Wanna Be A Country Cleaver! We met on Tasty Kitchen last summer and we became instant friends! I knew we would be best bloggie friends, especially when she wrote this on my wall:

Oh your blog is adorable!! And tuna casserole as your favorite food, you’re a girl after my own heart!! hahaha. Thanks for the add, I can’t wait to see more of your recipes and try what you whip up next!

Megan has such fun and witty humor and features stories about her pup Huckleberry, reflections on her years as a lumberjack, her love for Washington, planning her wedding to her sweetheart Ben and of course her delicous recipes! I love reading her blog and I'm so honored to have her write my very first guest post on my blog!
 
Now I will let Megan take it away with her Gimme S'mores Cupcakes.....
 
Every time I venture to Montana there is inevitably camping involved. And along with camping comes a fire – a big one. So, when Haley asked me to write a post for her I jumped up and down at the chance to honor my favorite Montana blogging buddy and contribute a couple of recipes taken from my favorite camping past time – S’mores making. How can you not love s’mores? Between the melted chocolate, toasty mallow, crunchy graham, sticky fingers and the flailing of burning marshmallow on a stick when you catch it on fire, its bliss.

To get this summer time camping nostalgia at home, these s’mores cupcakes should be at the top of your list. I will start you off with a moist chocolate cupcakes, homemade mallow frosting and have some grahams to scrunch on top.
So, for your Grocery List include…
2 cups White Sugar
1-¾ cup All-purpose Flour
¾ cups Unsweetened Cocoa Powder
1-½ teaspoon Baking Powder
1-½ teaspoon Baking Soda
1 teaspoon Salt
2 whole Eggs
1 cup Milk
½ cups Vegetable Oil
2 teaspoons Vanilla Extract
¾ cups Boiling Water

In a large bowl, stir together the sugar, flour, cocoa, baking powder, baking soda and salt.


(See Haley, still using 'em!! I love these things, they have little smiley faces on 'em! How can you not smile back?)

Add the eggs, milk, oil and vanilla, mix for 2 min.


And after all of that, don't forget to stir in the boiling water. Talk about fun, huh?


Batter will be thin. Don’t let this freak you out. They will set up to be very squishy, moist and absolutely scrumptious. Promise!


Pour into cupcake liners (about 3/4 full) . I really recommend using the aluminum foil liners if you can on this recipe. I realized I ran out a little too late and had to settle for the paper ones. Since these cupcakes are so fluffy, they need the structure of the aluminum liners to make sure they hold a nice shape and can handle a good frosting.

Bake these bad boys for 12-16 minutes or until a toothpick comes out clean. Cool in the tins for about 5 minutes until you can handle them without burning your paddies off and then move to a wire rack to finish the cooling process. Since ovens vary so drastically (mine is notoriously a pain in my rear!) I want to give you a broad range. These ones took about 15 minutes.

And now....to the fun part!! The marshmallow topping! This is where it does get a bit tricky, but if you're up for it, this frosting will pay off in spades. Spades, I tell you.

For your grocery list on this part you will need:
2/3 c. regular white sugar
 1/3 c. light corn syrup
 1 1/2 tablespoons water
 2 egg whites
 1/2 tsp. vanilla extract

It's deceiving how few ingredients you need here, but it will work for 24 cupcakes. I swear!

In small sauce pan over medium high heat, add the sugar, corn syrup and the water. Stir together until they are dissolved, bringing these to a rolling boil.

With a candy thermometer, keep a look out until 235 degrees is reached. This will take a few minutes, about five-ish.

In the mean time - you've got egg whites to whip sister! (Or brother, depending on who is reading this. I don't wanna be accused of gender-misrepresentation here!)

Now, I love love love adore my Kitchen Aid. But sometimes when I'm only needing to whip up some egg whites, particularly two - it's not enough to really utilize the whipping attachment, so I start it off by hand.

So, separate your two eggs leaving you with just the glorious whites. Beat the living day lights out of them until soft peaks form. It doesn't take as long as you think, so stick with it. And it's a good arm work out. The Shake Weight has nothing on beating egg whites.

After this is done, it is best to have your egg whites in the bowl you will be completing the frosting in, cause in this next step, you don't want to do this by hand.

When your boiling sugar/corn syrup mixture has reached it's 235 degree boiling point, turn your mixer on low and slowly pour in the syrup to your egg whites. This is going to be VERY scalding hot, so be careful. After they're incorporated, turn that baby on full blast and keep it beating until the bowl it totally cool. It'll take a while, so let that air work it's way in and do it's marshmallow-y business.

At the last step, just before you are done, add in your 1/2 tsp of vanilla. This will give them the proper mallowy taste.

Eons later after the batch has cooled... you'll be able to scoop it into a piping and top those cake babies.

Did I mention how sticky this process is?

Though, don't despair, a wonderful sense of accomplishment will follow your trudgingly difficult journey.

The frosting isn't always stiff, so after they pipe out lookin' all purdy, they will ooze all over like a proper toasted mallow and coat the cupcakes in gloriousness.

And to top 'em off - crumble up some graham and go to town!!

(But as a side note, be sure if you are not serving these right away, don't add the grahams until the last minute so they retain their crunchy properties.)

And away you go!! Serve these when you can't get outside into nature and have a rip roarin' fire with your friends. These will calm the urge until you get the real thing.

Thanks again Haley for guesting me on Girly Girl Cooks, it's been a blast, an honor, and I'm lucky to have such a great bloggie friend.
All the best and happy cookings!
~Megan

Momz....can i haz a cupscakez noww?

Related Posts Plugin for WordPress, Blogger...