Sunday, September 11, 2011

Football Spicy Wings

It's that time of the year. Back to school, the fall season, cooler weather to finally turn our ovens back on  and....Football! Tonight is the first Cowboy's game of the season, which means it's time to celebrate for Dusty. He has been a die-hard Cowboy's fan since before he can remember, so I'm making him the ultimate "man food" of chicken wings in honor of the game.


Is it delicious?
Yes!

Is it spicy?
Yes!

Will your fingers get dirty and will you be licking them?
Yes!

Will your lips be tingling?
Yes!

Are they high calorie?
NO!!!!!!

That is the best part of this recipe! I made chicken wings last year for a big Cowboy's game when Dusty had all the guys over and boy were they high caloric. Not that they weren't delicious, but with being on Weight Watchers and all, I wanted to enjoy some this year too and not get left out! So I did some researchin' and found this amazing recipe for chicken wings from Gina's Skinny Recipes. This website has saved me while I've been dieting. It's fantastic, the recipes are delicious, and you gotta check it out!

So can you guess how many calories these bad boys have???
Take a guess....
Give up?

250 calories and only 6 points for 2 wings!
My wings were a little bit larger than the original recipe on Gina's Skinny Recipes. Mine were about 4 ounces per wing, so that is 8 ounces per serving (1/2 lb). But even so, 6 points/250 calories is awesome and I didn't feel left out at all! Plus Dusty said that they tasted just as good, if not better, than the wings I made last year with all that butter and frying oil I'd used before. SCORE!


Here is what you are going to need for 3 servings:
-1-1/2 lbs Chicken Wings (6 wings)
-1/4 cup +1 tbsp Frank's Hot Sauce
-2 tbsp White Vinegar
-1 tsp dried Oregano
-2 tsp Paprika
-1-1/2 tsp Garlic Powder
-1-1/2 tsp Chili Powder
-Salt and Pepper
-Ranch or Blue Cheese Dressing (extra calories and points)

In a large plastic bag, combine 1 tbsp Frank's Hot Sauce, white vinegar, dried oregano, paprika, garlic powder, chili powder, salt and pepper. Cut the extra little funky tips off the chicken wings because they are useless and don't have any meat. Toss the trimmed wings into the bag with the marinade, shake it up well and let it sit out at room temperature for 30 minutes.

Preheat the broiler on Low for 5 minutes. Place the wings on an aluminum covered and greased (cooking spray) baking sheet. Place them in the oven, about 8 inches away from the broiler (about the middle rack) and bake for 8-10 minutes on each side. Meanwhile, in a small saucepan, warm up the remaining 1/4 cup of Frank's Hot Sauce.

Once the chicken has been cooked all the way through, remove them from the oven and toss them, one at a time, in the saucepan of warmed hot sauce. Arrange the wings on a platter or 2 wings on your plate with some veggies and ranch/blue cheese dressing for the ultimate "man food" for the big game!

Enjoy!

Pictured Above: Wings with Veggies and 2 tbsp of Light Ranch Dressing = 8 points!
Recipe Source: Gina's Skinny Recipes

Wednesday, September 7, 2011

BBQ Macaroni Salad

You are going to love this macaroni salad! Only 5 ingredients and you have a super easy and incredibly tasty side dish. This has become my go-to mac salad because I almost always have the ingredients on hand and it only takes about 10-12 minutes to make.

So here is what you are going to need {4 servings}:
-1 cup of dry Elbow Macaroni
-Salt and Pepper
-1/3 cup Mayonnaise
-1 tsp Chili Powder
-2 tbsp BBQ Sauce
-2 Greeen Onions-sliced thin

Pretty simple, right???

Bring 2 quarts of water to boil in a pot. Add macaroni and 1/2 tbsp salt to boiling water and cook until tender. Drain macaroni and rinse with cold water until cool. Drain briefly, so that the macaroni is still moist, then transfer to a large bowl.

Add mayonnaise, BBQ sauce, green onions and chili powder to the bowl....

...And toss to combine.
Season with salt and pepper to your liking.
You can either eat it now because the temptation will be too great, or you can cover the bowl with plastic wrap and chill it for about 30 minutes to an hour. Either way, it's all good!

Now I know I told you I was doing Weight Watchers, and I'm sure you guys are all thinking, "Really Haley? Pasta salad with Mayo?"
But let me tell you what....each serving of pasta salad is 4 points, approximately 200 calories! Each servings is a heaping 1/4 cup scoop of pasta salad and it is more than enough!

I had this for dinner last night and it was a grand total of 8 points!

Macaroni Salad = 4 points
Grilled Chicken Breast (3 oz) = 3 points
Whole Wheat Sandwich Thin = 1 point
Veggies (no spread) for Chicken Sandwich = 0 points
Chopped Tomato with Salt, Pepper and Dried Basil = 0 points

This just shows you can enjoy an absolutely delicious dinner for low calories (or points)!

Recipe Source: America's Test Kitchen 30 Minutes Meals


Monday, September 5, 2011

Getting Married!!!!

I'm so excited to announce that Dusty and I are going to be getting married July 13th, 2013!

That would be 677 days from now....just in case you were curious. Not that I'm counting or anything.

Last Friday I was so excited that Dusty was coming home from harvest, I just wanted to see him after him being gone for a month. It was probably one of the longest months of my life because I missed him so much. So you wouldn't believe how happy and excited I was that the day he came home from harvest that he popped the question!
It was the best day of my life.

The Proposal:
Dusty had only been home for an hour when he suggested for fun that we should go look at engagement rings at the mall, just for the heck of it. Also, because he knows how much I love going to the jewelry stores to look at the rings (because I like to drop unsubtle hints about wanting to marry him!). It would just be something fun to do on a hot day. I didn't really feel like getting out of my comfy clothes, so I suggested we could look online at some of the rings before going to actually look. As we were looking through the rings online, Dusty got up and walked behind me and the couch, not thinking anything of it I kept looking at the rings. From behind, Dusty said, "Oh, I really like that ring."
"Which one?" I asked, not aware of anything going on behind me.
"That one!"
"Ok, seriously. Which one are you pointing at?"
"This one..."

As I turn around, I look back to see Dusty holding a box with the most gorgeous ring I have ever seen in my entire life! At first I'm not believing my eyes, I thought I was seeing and imagining things, until he asked me...
"Will you marry me?"

I tossed the computer to the side, covered my mouth with my hand in complete shock, stood up to hug him and started crying hysterically saying, "Really? Oh my gosh! Really? YES!!! OF COURSE!!!"

It was the most wonderful moment of my life.

Dusty's hands were trembling as he took the ring out of the box and as he placed it on my finger. We were both smiling, laughing, hugging and crying tears of joy all at the same time. I'll never forget it. It was absolutely the most perfect proposal.

And can you believe how gorgeous this ring is???
He did good!

As it turns out, earlier in the month, Dusty, his mom and sister went to pick it out. He said that the moment he saw it, he knew it was the ring for me. I love that fact that his family was involved in helping him pick it out, it really means a lot to me, plus I love how the ring looks like an heirloom, even though it's not.
It's just absolutely stunning. Hopefully I don't get in a car accident, because I find myself staring at it while I'm driving! 

I also love that Dusty called my parents 5 days before he came home to ask for my parents blessing. I'm impressed that they were able to keep it a secret! I had absolutely no idea and was completely surprised!
Good job guys! Great work!

The Wedding:
Dusty and I have decided to wait until July 13th, 2013 to get married instead of next summer because we are both starting out our school programs this year, nursing for me and Dusty's health administration masters program. It would just be too stressful and I want to enjoy every moment of planning the wedding with Dusty, his family and my family. We don't want the wedding to feel rushed and stress everyone out. It's going to be a great time!

But don't you worry, we have already gotten quite a bit done already!
The next day after Dusty proposed, we went and loaded up on wedding books, magazines and planners. Dusty has already read his "groom book" and says he is good to go. I still have a lot of reading to do. I didn't realize how much goes into a wedding until I read the checklist!

 So, within the last week, we have picked out our colors....
Green, Purple and Blue (in various shades)

Plus we have already secured our venue (reception and ceremony) at The Daly Mansion thanks to the awesome help from my parents! We are so excited because Dusty and I have talked about wanting to get married there for about 2 years now, and it's finally a reality!

The grounds are stunning!

It's going to be so beautiful and so much fun!

Oh yeah, and of course my sister Annie is going to be the Maid of Honor, I like to call her my "MOH" for short.

Other than that, we have been cutting and pasting things that we love out of magazines and bookmarking things we see online. We are trying to collect as many ideas as possible for the big day!

Friday, August 26, 2011

Halibut en Papillote

Happy Friday!!!

This Friday couldn't have come soon enough because Dusty comes home from harvest today! He's been gone since the beginning of the August and I've been missing him like crazy. I should be used to it by now because he's gone home for harvest every year since we've been dating, but it's still hard being away from him.

But now he is coming home!!!!
(Can you tell I'm excited?)

I'm also excited to tell you that since I've moved to Billings, as of today I've lost 12 pounds!
College was rough on my body. I had a HUGE scholarship that created a lot of extra stress on me and I didn't know how to really deal with it. Instead of taking my stress out at the gym or going for a walk, I used food to comfort my stress and horrible anxiety. Each time I would start a diet I would work out like crazy and have no results. One time, I spent every morning for 3 months working out at the gym and lost only 3 pounds max. It just shows that I wasn't eating right during that time because you would have thought I would have had more results, but I didn't and I was very discouraged.

So why am I having so much success now? Two words....Weight Watchers.

I've been using the old program and it has been working fantastically! Plus after 5 years of college, I've finally learned how to deal with the stress of college and life. I don't let it get to me like I use to because I know everything will work out in the end.

With the Weight Watchers program, I love that I get to eat what I want, but in smaller portions. I feel content at the end of the day because I'm not cutting foods that I love out of my life, which is great!  I could never do a diet that didn't allow me to have any carbs, dairy or fats. It would lead to lots of frustration and instant failure. This program has been teaching me portion control and how to be smart with my meal planning to get the most out of it by making wiser decisions.

The only thing that is complicated with the program for me is that most recipes don't have calories listed on them, so I have to do the research myself. Thanks to a calorie counting App on my iPad or just by googling the calories, I add up all the calories myself for the recipe and then divide it into what each serving would be. It takes some time, but at least I get to eat all the recipes I'm dying to try! So with the combination of eating right and working out at least 30 minutes a day on my exercise bike, I'm having amazing success and feeling so great! I'm lovin' it!

As an example of eating what you want, here is a recipe from Halibut en Papillote from America's Test Kitchen that I calculated to be about 340 calories (7 points) and it was delicious! The original recipe calls for Halibut fillets, but all I could find was a Halibut Steak. So the 7 points is calculated for the steak, but I bet the fillet is definitely less calories.

Here is what you are going to need {2 servings}
-1 Zucchini, sliced 1/4" thick
-Salt & Pepper
-2 Plum Tomatoes, cored, seeded and chopped
-1 tbsp Extra Virgin Olive Oil
-1 clove of minced Garlic
-1/8 tsp dried Oregano
-Pinch of Red Pepper Flakes
-2 (6 ounce) Halibut Steaks- 1 to 1-1/2" thick
-2 tbsp Dry White Wine
-2 tbsp chopped fresh Basil
-Lemon wedges, for serving

In a colander, toss the sliced zucchini with 1/4 tsp salt, and let drain for 30 minutes. Spread the zucchini on a double layer paper towel and pat dry and wipe of any residual salt. Adjust the oven rack to the lower-middle position and heat the oven to 450 degrees (F).

In a medium bowl, combine the tomatoes, oil, garlic, oregano, red pepper flackes, 1/4 tsp salt and pinch of pepper. Pat the halibut dry with a paper towel and season with salt and pepper on both sides.

Cut four 12-inch sheets of aluminum foil and arrange the zucchini in the center of the foil in a shingle formation of two foil sheets. Drizzle 1 tbsp of white wine over each mound of zucchini, then lay the haibut steak on top. Spoon tomato mixture on top of the halibut. Place second square of foil on top of each stack and fold edges over several times to seal and make an airtight pouch.

Lay the packets on a rimmed baking sheet and bake for 12 minutes. Carefully open packets away from you, so the steam escapes away from you, and then use a spatula to gently lift the halibut and vegetables onto your plate. Sprinkle with basil and serve with lemon wedges.

(I was hungry, so I also had some peas to go along with my tasty dish)

Enjoy!

Wednesday, August 24, 2011

Some Things I Want To Bake...

I love spending my free time reading through my favorite blogs and bookmarking all the delicious recipe that I'm wanting to try. Here are a few of the mouth-watering baked goods that I'm dying to make!

Photo from Gina's Skinny Recipes

Photo from Eat Yourself Skinny

Photo from WBACC

Photo from Life as a Lofthouse

Photo from Food Network

Photo from Two Peas & Their Pod

Photo from Cook Bake & Decorate

Don't these recipes look scrumptious? Who needs a cookbook when there are so many talented bloggers and ideas online?!?!?  I can't wait to try these recipe out over time and enjoy every bite!

Sunday, August 21, 2011

Cheese-Making Kit Giveaway!

Today I spent the day cleaning my entire apartment. I mean serious cleaning. Like top to bottom cleaning. It was intense. Every inch of the apartment sparkles now and smells super fresh in prep for school starting next Monday.

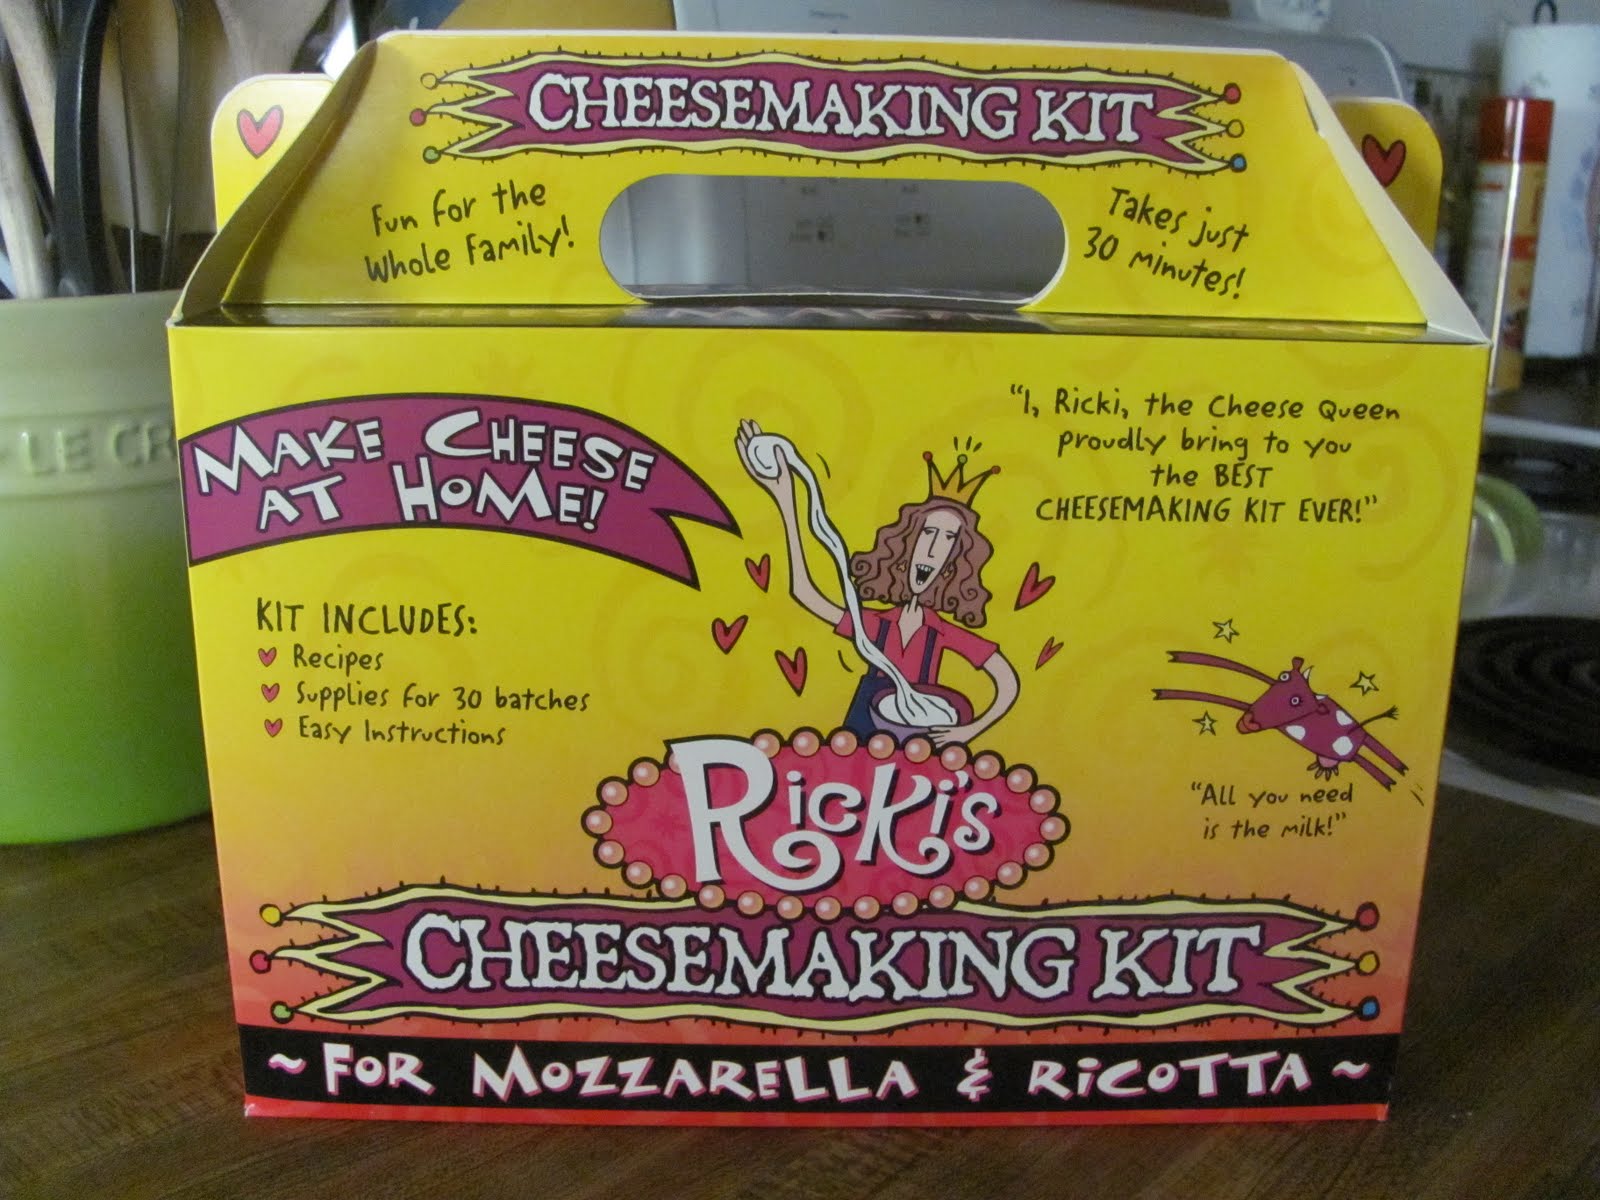
While I was cleaning out my kitchen I found this fantastic cheese making kit!

I got it when I took a cheese making class and haven't even opened it. I've been so busy with moving, getting settled, working, summer classes and prepping for nursing school next week, I haven't even had a chance to touch it! I received my schedule for classes, labs and clinicals for this Fall and I probably won't be able to use this awesome kit or give it the love it needs. This means I'd like to pass this totally awesome and fantastically fun kit on to you!

The kit includes....
-Recipes for Ricotta, Cottage and Mozzarella Cheese + more!
-Supplies for 30 batches:
  • 8 oz Citric Acid
  • 8 oz Cheese Salt
  • 1 yard of Cheesecloth
  • Dairy Thermometer
  • 10 Rennet Tablets
-Super Easy Intructions!

TO ENTER:
Leave a comment on this blog post answering the following question...
What is you favorite type of cheese?

Is it fresh mozzarella, blue cheese, feta cheese, gruyere? What's your favorite!?!? If you love cheese as much as I do, then you are going to love this kit! It only takes 30 minutes and then you have fresh cheese of your own. It's super easy and the instructions are great too!
How cool is that?

For extra entries, follow The Girly Girl Cooks on Facebook and/or Twitter and leave a comment on this blog post telling me you follow me! Winner will be selected randomly and revealed Thursday, September 1st!

Not a paid advertisement by Ricki's Cheese Making. They don't know who I am and I just want to share the lovin'!

Saturday, August 20, 2011

The Cutest Little Bundt Cakes

I just think that this Blueberry Bundt Cake is the cutest dessert ever!

I love single-serving desserts like cupcakes because you don't have to share. It's yours and yours alone! Plus it allows you to not overindulge, which I tend to do with slices of cake and pie. If I've gotta whole delicious pie in front of me, I'm gonna want to eat it all! It's kind of a problem. But this dessert is perfect. It's cute, summery fresh and delicious!

For a perfect individual bundt cake, you are going to need these adorable 1-cup bundt pans from World Market. I'm sure they are found at other cooking supply stores, but these were only $1.49 a piece! I love a good deal.
Picture from World Market
Don't have a World Market near you? You can order these cute pans on their website....HERE!

Anyways, I found this fantastic recipe from America's Test Kitchen "Cooking for Two" magazine. Over the summer I have fallen in love with ATK and all of their delicious recipes. I like that they give in-depth explanations of certain steps and processes, and why the recipe works.

Here is what you are going to need for 2 Individual Bundt Cakes:
-1/2 cup All Purpose Flour
-1/2 tsp Baking Powder
-1/8 tsp Salt
-3 tbsp softened Butter + more for greasing pans
-1/4 cup Sugar
-1 large Egg, room temperature
-1/4 tsp Vanilla Extract
-2 tbsp Milk, room temperature
-1/2 cup ripe Blueberries

Adjust the oven rack to middle position and preheat the oven to 350 degrees (F). Grease two 1-cup bundt pans with butter.

In a small bowl, whisk the flour, baking powder and salt together. In a medium sized bowl, beat butter and sugar together with a hand mixer or by hand on medium speed until light and fluffy, 3 minutes.
*A KitchenAid mixer is not going to work on this recipe since the amount of ingredients is so small, so use a hand mixer instead (ATK tips!).

Beat in the egg until combined, about 30 seconds. Beat in vanilla until incorporated. Reduce mixer speed to low and beat in 1/3 of the flour mixture, followed by 1 tbsp of milk.  Repeat with half of remaining flour mixutre until just incorporated. Then add in the blueberries and gently fold them in.
*Your batter will be thick, so don't panic!*

Divide the batter evenly between prepared 1-cup bundt pans, smooth tops and gently tap each pan on counter to settle batter. Place pans on baking sheet and bake the cakes for 20 to 30 minutes, rotating halfway through, until toothpick comes out clean.

Once the cakes are done baking, allow the cakes to cool for 10 minutes in their pan. Then flip them out onto wire rack and let them cool completely for 30 minutes. Make a glaze or dust with powdered sugar and you are ready to enjoy your tasty (and cute) dessert!


PRINT RECIPE HERE!
*Not a paid advertisement for World Market, I just like their stuff!*

Wednesday, August 17, 2011

Birds Eye Chef's Favorite {Review}

Last week I received a really fun surprise in the mail....a box full of Birds Eye Chef's Favorite side dishes through the Foodbuzz Tastemaker program!

I was so excited to recieve my goodie box, you have no idea! And now I'm here to tell you about the super delicioius Roasted Red Potatoes & Green Beans that I enjoyed the other night.

Some nights I struggle with creating a good side dish to pair with my meal. I put all this effort into making an awesome main course, and then I forget about the side dish...oops! So the other night I made a pan-seared chicken breast and didn't know what side to have with it.
Salad? No.
Broccoli? No.
Ugh. 

Then I remembered I received my box of goodies and paired my chicken breast with the Roasted Red Potatoes & Green Beans. It was easy and delicious!

Just pop the bag into the microwave for about 6-7  minutes to steam cook in the microwave, and you have a side dish that is good to go!

I mean, look at this. Does this look like nasty frozen food?
No way! I looks like I slaved in the kitchen for at least an hour.
I was impressed.

The green beans were crisp. The potatoes were cooked perfectly and the light sauce add a very nice touch. Each bag has 2 servings, which is great for couples like Dusty and I! But since he is gone at harvest, I got to enjoy the 2nd serving for lunch the next day (and it reheats really well!).

If you are a busy parent, college student or just busy with life, I really recommend these great side dishes by Birds Eye for when you want something quick, easy and tasty. Did I mention it's pretty low calorie? Depending on the side dish, it ranges from 90-180 calories per serving...not bad at all!

The "Chef's Favorites" will be available in September, so keep an eye out for them!

P.S. The Primavera Vegetable Risotto was really good too! I had that one last night with dinner, and for lunch today with a salad. YUM!

*Thanks Foodbuzz and Birds Eye for the chance to sample and review this great product!*

Sunday, August 14, 2011

Homemade Sushi

I did it! I finally attempted to make Sushi for the first time and succeeded!
And you wouldn't believe how easy it is to make too.

I love sushi and I was so disappointed when I moved to Billings that they didn't have "Dollar Sushi Night" like Missoula did. So since I've moved here, I've been determined to make my own so I don't have to pay the big bucks. I went to World Market and loaded up on supplies and got a really great sushi kit to help me!

You have to check out this amazing blog post from Mommy's Kitchen. She gives step-by-step instructions that I used to make my California Rolls. Her instructions are the best I could find online and I know you will be able to make perfect sushi like I did if you read this!

I don't think I'll go out for sushi again....it was that good and easy to make!


Thursday, August 11, 2011

Tropical Salad Dressing

This blog post is going to be a quicky today because there isn't much to say about a good salad dressing! It's just good!

Besides Litehouse Buttermilk Ranch and Thousand Island Dressing (to make my In-N-Out Animal Fries), I never buy salad dressing. I grew up with my mom making the best italian dressing from scratch and I've been spoiled ever since! I've also become addicted to Simply Scratch's Sweet Basil Vinaigrette too. That dressing is on my top 5 favorite dressings of all time.

This Tropical Salad Dressing is on my list too. It has a completely different flavor from my other favorite dressings, but it's perfect for summer. So good, I could drink it!


Here is what you are going to need:
-1 cup Pineapple Juice
-1/2 cup finely minced Red Onions
-3 tbsp Brown Sugar
-2 tbsp Rum (or Water)
-1 tbsp Lime Juice
-1 tbsp finely chopped Walnuts
-1 tbsp Bacon Crumbles

In a small saucepan, combine the pineapple juice, red onions, brown sugar, rum and lime juice. Bring the mixture to a boil and then reduce the heat. Simmer the salad dressing for 5 minutes until slightly reduced. Take the saucepan off the heat and stir in the walnuts and bacon.
Serve warm on your salad or chill in the refrigerator.

Enjoy!

Recipe Inspired by: Cooking Light Complete Cookbook

Wednesday, August 10, 2011

Huckleberries, A Wedding and Combines

I can't believe how long it has been since I've done a blog post! Am I a terrible blogger or what?

Since my last blog post, I haven't been ignoring you all, I've been on the road! In fact, I pretty much did a full loop of Montana in 1 week.

That's 17 hours of driving, which is the most driving I've done alone in my entire life! But I didn't just drive this crazy loop for nothing, I went home to visit my family, be a bridesmaid in my friends wedding and visited Dusty's family. It was action packed but also really relaxing. I needed a vacation.

Before I could start my weeklong trip, I couldn't leave Billings without taking my final exam for summer school. I've spent the past 12 weeks taking Pathophysiology and of course I chose to leave for my trip the day of the final. (Typical Me). So I stayed up till midnight the night before I took off and took my 3 HOUR FINAL!  By 3 a.m. I was a crazy mess and couldn't wait to go to sleep because I knew I had a 6 hour drive in the morning. I'm glad to report that I got a 99% on the final exam and an A in the class, and that I also arrived to my parents house safe and sound, even though I was frazzled from the midnight final.

I had a great time with my family when I was at home. They got kayaks this summer so we spent the  4 days I was home camping at the lake, kayaking and huckleberry picking! We have never been huckleberry picking before and it was a total blast! Although, I think I will come home in the middle of July next summer because the berries were all shriveled up and picked over. We spent 4 hours picking and I only got 1 cups worth! No wonder huckleberries are so expensive to purchase, it's really labor intensive, but oh so good!
Plus I got to go see the last Harry Potter movie with my mom and sister. I've been dying to see it since it came out in theaters and I'm not going to lie, I cried like a baby at the end. So good!

After 4 really fun days of being home and at the lake with my family, I headed up to Kalispell for my friend Amy and Carter's wedding. It was fun, beautiful and so great to see all my friends again!
I'm the first girl on the right side with the really bad sunburn!

I had to leave the wedding reception early because I had to drive 3 hours that night to Dusty's family farm. Instead of driving about 8 hours from Kalispell to Billings, I decided to split it up, and I am glad I made that decision. It made the drive more bareable, plus I always love visiting his family and their pup Molly!

Dusty's dad took me out on the combine and it was so much fun! I probably bugged him so much because I was asking a million questions a minute about everything with the farm, harvesting and how it all works. I was fascinated! I just love visiting with his mom too. We talk about everything and anything, but mostly dresses and wedding shows. Dusty probably rolls his eyes with all the girl talk we have, but I don't care!  After spending 30 minutes of saying goodbye to Dusty and forcing myself in the car, I drove a long 5 hours back to Billings.

Now that I'm back from my trip, that means I get to be back in the kitchen and back to work with assisting cooking classes. I definitely loved my trip, but it feels good to be home too!

P.S. I can't believe how much I miss in the blogging/cooking world by being gone a week! I have a ton of blog posts to read and catch up on! Missed you guys!

Friday, July 29, 2011

Cheesy Chili Mac

As I'm sure you have heard that Borders bookstore is going out of business. It's very sad for the company and all of its employees, but GREAT for us! Magazines are 40% off and I loaded up on all of the America's Test Kitchen magazines I could find!

Usually I never buy ATK because the magazines run about $10.00, which is alot for a magazine. I'm more comfortable in the $4.00 range. But when the magazines were on sale it brought the price down to $4.77 a piece. There is nothing like a good sale!

On of the magazines I purchased was ATK's Skillet Suppers, and who doesn't love a dinner that can be made in one pan? One of the recipes that spoke out to me this evening was Cheesy Chili Mac, because Dusty hasn't been feeling well and I just wanted comfort food.
I always want comfort food!


The original recipe ingredients list says to use Italian Blend Cheese, but I think that was a typo. Because after I went to the grocery store, bought the Italian Blend Cheese and came home, I read the description of the recipe a little more closely and it talks about MEXICAN Cheese Blend.
????????
It tasted good with the Italian Blend, but definitely use Mexican when you make this.

I also love that this recipe is comfort food, but doesn't call for 1 stick of butter or 1 cup of heavy cream. Don't you just hate that? Dishes like that go from "Comfort Food" to "Guilt Food" instantly for me. It drives me crazy! But this dish makes me very happy!

Here is what you are going to need for Cheesy Chili Mac:
{4 servings}
-1 tbsp Canola Oil
-1 medium Onion, minced
-1 tbsp Chili Powder
-1 tbsp Ground Cumin
-1/2 tsp Salt
-3 cloves of minced Garlic
-1 tbsp Brown Sugar
-1 pound 90% Ground Beef or Turkey
-2 cups Water
-1 (15 ounce) can Tomato Sauce
-2 cups (8 ounces) Elbow Macaroni
-2 cups shredded Mexican Cheese Blend
-Salt and Pepper to taste

Heat oil in 12-inch skillet over medium heat until shimmering. Add the minced onion, chili powder, cumin and 1/2 tsp Salt. Cook, stirring often, until softened (about 5 to 7 minutes). Add in the garlic and brown sugar and cook until fragrant (30 seconds). Add ground beef/turkey and cook until no longer pink (3 to 5 minutes).

Stir in water and tomato sauce, then add in the elbow macaroni. Increase the heat to medium-high and cover the skillet. Stir often and make sure to maintain a vigorous simmer until macaroni is al dente.

Take the skillet off heat and stir in 1 cup of the cheese and season with salt and pepper to taste. Sprinkle the remaining cheese over top, cover and let the cheese melt for about 2 to 4 minutes.

Serve and enjoy your bowl of comfort!

Tuesday, July 26, 2011

Shrimp Cocktail Dip

I've taken my food blogging to a whole new level by getting crazy obsessed with recipe contests! Whether it's America's Test Kitchen or Real Women of Philadelphia, I'm lovin' it. I could have kicked myself this spring with the RWOP contest going on, because I couldn't participate. It was during the end of the school year with finals, graduation and moving. Too much in my life to set aside time to participate. But it was so much fun to see some of my blogging friends, The Church Cook, The Hill Country Cook and Cook, Bake & Decorate participate and do awesome with RWOP!

Now that life has calmed down quite a bit, I'm all about getting in there and having fun with these competitions. I was even featured on America's Test Kitchen for their Fresh Ingredient Challenge: Blueberries!

This weeks contest at RWOP is an appetizer contest and I was all over that, I entered one of Dusty's family favorites....Shrimp Cocktail Dip!
Check out the recipe HERE at RWOP!
If you belong to RWOP, add me as a friend, I'd love to connect online with ya!

*Thanks Julie for the recipe, it is so tasty and delicious!*

Sunday, July 24, 2011

Jamaican Jerk Burgers

Tonight I was craving a burger, but not just any plain burger, and definitely not a fast food burger! I wanted something with bold flavor that was different from anything I've had before that wouldn't weigh me down. After flipping through my Bon Appetite Cookbook, I found the perfect burger to inspire me to make a burger that would satisfy all my needs...Jamaican Jerk Burger with an Chipotle-Orange Mayonnaise!


Poor Dusty has to work late tonight, so he didn't get to enjoy this burger with me. But because I'm a loving girlfriend, I have his burger prepped, marinating and ready to go on the George Foreman Grill right when he gets home. He is going to be so surprised by how tasty his dinner is tonight after a long night of work!

The recipe makes 6 servings, which is how I'm going to give it to you because I gotta tell you, the conversions from 6 servings to 2 servings hurt my brain. So I'll let you figure out how many servings you need and you can go from there!

For the Chipotle-Orange Mayonnaise:
-1 cup Mayonnaise
-3 tbsp fresh Orange Juice
-1 tbsp minced Chipotle Chile in Adobo Sauce
-1 tbsp Adobo Sauce

This is super easy, so brace yourself! Add all 3 ingredients into a bowl....

And stir to combine.
I could have just eaten this alone (although that would be gross), because I love the smokey citrus flavor of the mayonnaise. So good! After you mix to combine, cover with plastic wrap and put it in the fridge until you are ready to serve with the Jamaican Burger.

For the Jamaican Jerk Burger:
-1-1/2 cups coarsely chopped Green Onions
-1 tsp dried Thyme
-2 Jalapeno Peppers, seeded and chopped
-3 Garlic Cloves
-1/2 cup Brown Sugar
-1/2 cup Canola Oil
-1/2 cup Low Sodium Soy Sauce
-1 tsp Ground Allspice
-1-1/2 lbs Ground Beef
-6 Buns
-Condiments: Lettuce, Tomato and Grilled Yellow Onions

In a food processor, combine the first 4 ingredients...

And pulse until finely chopped.

Then add in the next 4 ingredients {Brown sugar, Canola oil, Soy Sauce and Allspice}....

And puree until almost smooth.

Form the burgers into patties and place into a baking dish. Pour 1/2 cup of sauce over all the burgers, toss to coat and let them marinate for 20 minutes. The rest of the sauce will be used for basting the burgers while they cook.

Grill the onions, slice the tomatoes and tear up the lettuce while the beef marinates. Also, if you choose to make them, start cooking up some fries or potato wedges.

After 20 minutes, now it is time to grill the burgers! Grill the burgers until desired doneness (about 4 minutes per side), brushing occasionally with the remaining jerk sauce.

Spread the Chipotle Mayonnaise on both inner sides of the bun. Place the lettuce on the bottom half of the bun with the tomato, burger, onion and then the top half of the bun.
Enjoy!

Related Posts Plugin for WordPress, Blogger...