Friday, June 28, 2013

French Breakfast Puffs

It's official. Duke has taken over our bed and we are never getting it back. 

It all started 3 weeks ago when we let him on the bed one morning to snuggle. Then it progressed to him getting in bed with us at 6 am when I let him out to go to the bathroom in the morning. Now at 2 am, Duke decides he has had enough of his crate and must sleep with Dusty and myself for the rest of the night.

You give them an inch and they take a mile.

After 15-30 minutes of licking, nibbling and maneuvering, Duke finally settles down for the night to sleep right smack dab in the middle of us. He then spreads his body and legs as far out as possible to take up half the bed. Between Duke and Dusty, I get a total of 5 inches of bed and absolutely no blankets! We are going to need to get a king bed ASAP! He is only 1/3 the size he is suppose to be and I can't imagine sharing a bed with Duke and Dusty when Duke becomes full grown. Yikes! 

The pathetic thing is, I can't stand to make Duke move. Why is it that when your pet sleeps on your bed and it's uncomfortable for you, it's so hard to find the heart to make them move? I just can't do it!

After 4 hours of only have 5 inches of bed to sleep on because of Duke, I decided to get up early this morning and make some French Breakfast Puffs for the ladies in Dustys Administration office at the hospital. My mom got me the Babycakes Cake Pop Maker for Christmas and I still hadn't used it yet (I'm terrible, I know) and I was dying to give it a try. I thought this would be a fun way to break in the cake pop maker with a fun breakfast treat!


Just after making this French Breakfast Puffs (which were incredible and baked in 4 minutes!), I am currently obsessed with this cake pop maker! I prefer to make my actual cake pops the original way without the machine, but I would love to use it to make different flavored doughnut holes!

Growing up in Hamilton, the local IGA has the very best donuts ever! I think they are better than Crispy Cream Doughnuts and any other doughnuts I've ever had...and most people who have tried them think so too. They are so good, that by 10 am those babies are gone! It was always a special treat when we would go get doughnuts from IGA growing up and it's still really fun when I come home to visit to get up really early and get everyone some old fashion doughnuts. I love that with this cake pop maker if I get the hankering for some doughnuts I can now whip them up in no time!

Now I'm just trying to fight the urge to get the mini-doughnut maker with the Mini Donut book by the talented Jessica of The Novice Chef blog! I need help. STAT! 

French Breakfast Puffs
{2 Dozen Puffs}

-1 cup Sugar, divided
-1/3 cup softened Butter
-1 Egg
-1/2 tsp Vanilla Extract
-1-1/2 cup Flour
-1-1/2 tsp Baking Powder
-1/2 tsp Salt
-1/4 tsp Nutmeg
-1/2 cup Milk
-1/2 cup melted Butter
-1/2 tsp Ground Cinnamon

Plug in your cake pop maker and preheat so that the light glows when "ready".

Beat together the softened butter and 1/2 cup sugar until light and fluffy with a mixer/stand mixer over medium speed. Add in the egg and vanilla extract and beat to combine.

In a bowl, stir together the flour, baking powder, salt and nutmeg. While the mixer is going on medium speed, alternately blend in the flour mixture and 1/2 cup of milk in thirds, ending with the milk.

Place the doughnut batter in a pastry bag or ziploc bag with the corner clipped and fill each reservoir with approximately 1 tbsp of batter. Close the cake pop maker and bake for 4 minutes until the toothpick inserted comes out clean.

While the puffs are baking, combine 1/2 cup sugar with 1/2 tsp ground cinnamon in a bowl and stir to combine. Then in a loaf dish or large microwavable bowl, melt 1 stick of butter. Set aside.

Immediately after the puffs have baked, roll them in the melted butter and then roll them around in the cinnamon-sugar mixture. Enjoy with a tall glass of milk!

Recipe Inspired & Adapted By: Babycakes Cake Pop Instruction Manual & Recipes
All opinions and views about the Babycakes Cake Pop Maker are my own. They don't even know I exist! I just love this cake pop maker so much I had to share!

Monday, June 24, 2013

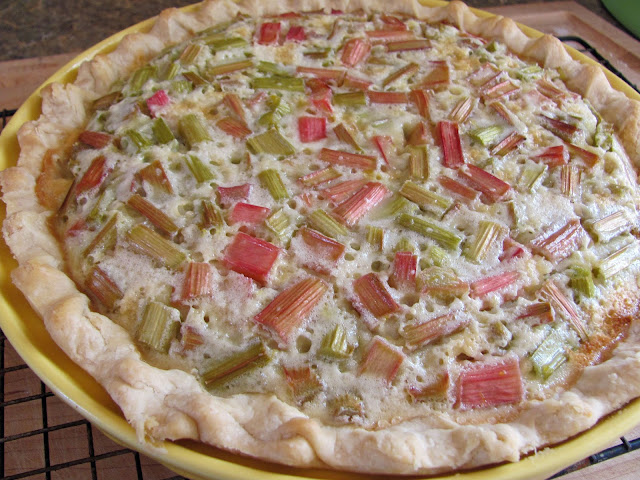
Rhubarb Custard Pie

One of the best things about Dusty getting his job in Chester is that we now live only 40 miles away from his family. Just a 35-40 minute quick drive on open country roads and we are there. This means any treats I make I get to share with them...like this fantastic pie!


A couple weeks ago when my parents came to visit, we stopped by Dusty's grandparents farm for a quick visit. While we were there his grandmother gave me sooooo much rhubarb! I wish I had taken a picture of all the rhubarb I had. It was overwhelming and insane. I've only used rhubarb once before and I don't have much experience baking and/or cooking with it. I tell you what, I've been googling rhubarb like a mad woman over the past few weeks!

Did you know rhubarb is actually a vegetable???? I had no idea! I knew that the rhubarb leaves were poisonous (Dusty didn't know that until I just recently told him), but I had no idea this tangy stalky plant was in fact a veggie! You just learn something everyday, don't cha? Thank you google.


To use up the copious amounts of rhubarb, I got creative with a couple of recipes. One is a stuffed french toast I'll be sharing with you during Berry Week in July (be on the look out!) and the other one is this colorful, tangy and heavenly, creamy pie....


Rhubarb Custard Pie
-1 pre-baked Pie Crust
-3 cups chopped Rhubarb, 1 inch pieces
-3/4 cup Sugar, divided
-1/2 tsp Orange Zest
-1 tbsp Orange Juice
-2 Eggs
-2/3 cup Half & Half
-1/4 cup Flour
-1 tsp Vanilla Extract
-Powdered Sugar, for serving

Preheat the oven to 350 degrees (F).

In a medium bowl, add the chopped rhubarb and toss with 1/4 cup sugar, orange zest and orange juice. Set aside. For the custard, in another medium bowl, whisk together the 2 eggs, half & half, flour, 1/2 cup sugar and vanilla extract.

Transfer the rhubarb mixture to the baked pie crust and spread evenly over the bottom of the pie. Place the pie on a baking sheet (to prevent spilling from potential bubbling) and then pour the custard liquid over the rhubarb in the pie. Bake for 1 hour and 15 minutes until the custard-rhubarb filling is puffed, set, slightly golden brown and no longer wet. Place the baked pie on a cooling rack and cool completely. Dust with powdered sugar before serving. Enjoy!

*The pie tastes better the next day when it's been sitting in the fridge overnight!*
Recipe Inspired & Adapted By: Food Network Kitchen

Wednesday, June 19, 2013

Avocado-Mango Shrimp Quesadillas

Do you have some leftover Avocado Mango Salsa from Mondays post? I didn't think so. That salsa is sooooo good! But in case you do have some of that wonderful salsa hanging around your fridge and want to use it up before the avocados start turning brown (yucky), use it to make this seriously awesome quesadilla!


By the way, do you have the Picky Palate cookbook? You should! Jenny is one of my favorite bloggers and her cookbook is on my top 10 favorites list. Why do I mention this? Because she changed the way I make quesadillas forever! Dusty use to think I was so weird because I would just sprinkle some shredded cheese between 2 tortillas, microwave it and call it good. Nobody showed me any different, how was I suppose to know!?!?! Man, I was weird!

Jenny's cookbook introduced me to the concept of spreading cream cheese on the tortilla and then pan frying it with butter so the tortilla is golden and crisp. Let me tell you what, cream cheese with your quesadilla is life changing! It adds another dimension of cheesy creaminess. It's the only way I'll make my quesadillas for the rest of my life.


Quesadillas have become a lunch staple in our home ever since we moved to Chester and Dusty started his job. They are quick, easy, cheap, versatile and oh so delicious. You can put everything but the kitchen sink into a quesadilla and it will be good. So when I had a bit of leftover Avocado Mango Salsa, I thought why not!  and combined it with some cooked shrimp, cheddar cheese and of course cream cheese! It turned out to be a magical combination and I can't wait for your to try it!


Avocado-Mango Shrimp Quesdillas
{Makes 2 Quesadillas}

-8 Jumbo-Sized Shrimp
-1/2 tbsp Olive Oil
-1/8 tsp Chile Powder
-1/8 tsp Salt
-Dash of Pepper
-2 Burrito-Sized Flour Tortillas
-2 tbsp softened Cream Cheese
-1/2 cup shredded Cheddar Cheese
-1 tbsp Butter
-Sour Cream & Avocado Mango Salsa (for serving)

Heat the 1/2 tbsp olive oil in a pan over medium heat. Season the shrimp with chile powder, salt and pepper and then add it to the pan. Cook and stir until the shrimp becomes cooked through and pink. Remove from heat and chop into bite-sized pieces. Set aside.

Spread half of each tortilla with 1 tbsp softened cream cheese. Top with 1/4 cup Avocado Mango Salsa on each tortilla. Divide the shrimp in half between the two tortillas and top them over the salsa. Sprinkle the tortillas with 1/4 cup of shredded cheddar cheese. Fold in half.

Heat a large skillet over medium heat and melt 1/2 tbsp of butter in the skillet. Place the quesadilla in the skillet and cook until the tortilla is golden brown and the cheese has melted. This should be 2-4 minutes per side. Repeat with the second quesadilla. Using a pizza cutter, cut each quesadilla into 3 wedges. Top with a dollop of sour cream followed by some more Avocado Mango Salsa. Enjoy!

*For a vegetarian style quesadilla, just omit the whole shrimp thing. It will still be delicious!*

Recipe Inspired By: Jenny Flake of Picky Palate
*All opinions of the Picky Palate cookbook are my own...I love this book!*

Monday, June 17, 2013

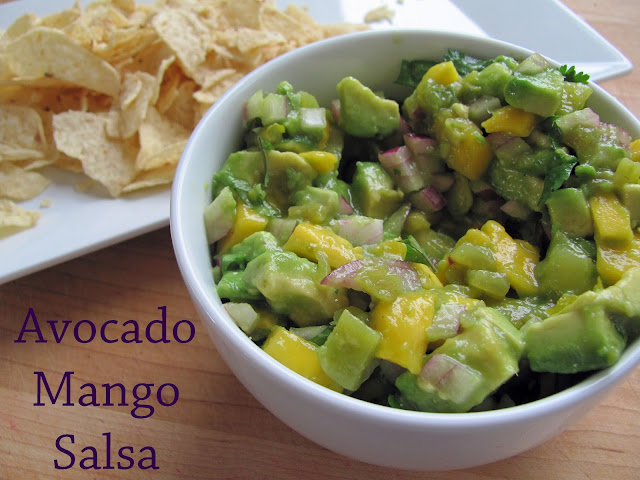
Avocado Mango Salsa

I feel like summer has finally arrived! Dusty, Duke and I headed to the local farmers market on Thursday where we enjoyed watching Duke interact with little kiddos, ate a couple burgers and met even more people in the community. My favorite purchase of the evening was a large flower box with 4 different varieties of lettuce. Hopefully I don't kill them! So far my black thumb hasn't been too bad because my tomato plant is starting to grow tomatoes and my mason jar herb garden is starting to sprout little herbs. Maybe I can continue my lucky streak and keep the lettuce box alive! The market didn't have produce yet because it's still early in the season, but I look forward to getting some when it finally does arrive.

So in the meantime while I patiently wait for the farmers market produce, I'll have to get my produce at the local grocery store. My small grocery store in my very tiny town may not have a lot of variety, but it does have two of my favorite things this summer....Avocados and Mangos! Living in Billings, I couldn't find any mangos and if I did, it was either super firm or overly ripe. The produce there was always sad and pitiful. Surprisingly, the mangoes here in Chester are always perfectly ripe and ready for cooking, baking and eating. Who would have thought? 


So what better than to combine my two favorite tropical foods to make one awesome salsa. A couple years ago when I was an assistant for culinary classes, we hosted a Mexican themed class with the best avocado-mango salsa. The only type of salsa I'd had before was always tomato-based like in a jar or at a restaurant. I loved this new salsa combo when I first encountered it and I still do! That's why years later I am still making this slightly sweet, tangy and creamy salsa. 

Grab a bag of tortilla chips, a margarita and enjoy this fresh salsa with your friends and family! It will be a huge hit and everyone will love it. You won't be able to stop scooping up and shoveling in your mouth this avocado-mango goodness!

Avocado Mango Salsa
(Serves 2-4)

-2 Hass Avocados, diced
-1 tbsp Lime Juice
-2 Mangos, peeled, seeded and diced
-1/2 cup finely diced Red Onion
-2 tbsp chopped Cilantro
-4 ounce can Diced Green Chiles
-Salt to taste

Place the diced avocados in a bowl and toss with the 1 tbsp of lime juice. Add the rest of the ingredients to the bowl and stir to combine. Serve with tortilla chips or with your favorite Mexican dish! Enjoy!

Recipe Inspired & Adapted By: The Copper Colander

Friday, June 14, 2013

"The Cheesehead" Grilled Cheese

I couldn't help myself. I had to do it again. I accomplished another restaurant remake from the local Shelby Sports Club. They have a grilled cheese sandwich like no other....The Cheesehead.

I put my Chipotle-Garlic Mayonnaise to good use when making this sandwich because the components of the sandwich include 3 types of cheese, tomato and chipotle mayo. This all makes for a fan-freakin-tastic grilled cheese sandwich I tell you what! Way better than just your typical american cheese slices slapped between two slices of bread.

I gotta admit, this is a ridiculous amount of cheese, but it's so good! It wouldn't be a "cheesehead" without tons of cheese. I just love how the cheese oozes out....mmmm. Total comfort food.

To make this ultimate cheesy grilled cheese, you are going to need to gather your supplies:

Bread, Tomato, Chipotle-Garlic Mayonnaise, American Cheese slices, Cheddar Cheese, Mozzarella Cheese and of course, Butter!

Then it is time to assemble!

It's very important that you do it in this order:
1. Slice of Bread
2. 1/2 tbsp Chipotle-Garlic Mayonnaise
3. 1/4 cup Shredded Cheddar Cheese
4. 1 Slice of American Cheese
5. 2 Slices of Tomato
6.1/4 cup Shredded Mozzarella Cheese
7. Top it with another slice of bread with 1/2 tbsp chipotle-garlic mayonnaise spread all over. 

Then spread the bread slices with some butter like you would for any other typical grilled cheese and cook for 1-2 minutes per side! Eat and then go work out. You are going to need it after consuming this spicy cheesy goodness. At least there is a tomato on it, right? That counts for something!

Wednesday, June 12, 2013

Parmesan Gnocchi

This recipe has been a long time coming. In fact, I've been meaning to create this recipe since February when I first encountered Parmesan Gnocchi at one of my favorite restaurants in Billings, The Granary.


My parents came to visit us in Billing for Shrek: The Musical back in February and before the show we went to dinner at The Granary. We don't usually order appetizers, but one of my nursing classmates was working there that night and convinced us that the Parmesan Gnocchi was pretty spectacular. We agreed and the next thing we knew a large rim bowl was brought to our table with beautiful gnocchi dumplings swimming in a pool of the most wonderful cream sauce. The gnocchi was gone in seconds between the five of us at the table and we then started dunking our slices of bread in the sauce to savor every last drop. The next morning we drove over to World Market and loaded up on gnocchi (I should have bought more!) so we could try recreating it ourselves.

The funniest part was my dad couldn't quite grasp the pronunciation of gnocchi. It's really pronounced noh-kee, but my dad kept calling it nookie. You know, like the stuff done behind closed bedroom doors! My dad was telling everyone that night "how much he loves nookie" and we were all laughing hysterically. It's now become the family joke and gnocchi will never be pronounced the same among us.

After all this time, the packages of gnocchi we bought back in February have been sitting in my pantry calling my name. The other night I finally decided to give it a go and try to recreate that marvelous parmesan cream myself. To my pleasure and excitement, I replicated the cream sauce perfectly! Now that I don't live in Billings anymore I can have Parmesan Gnocchi here in Chester!

Parmesan Gnocchi
{Serves 4}

-16 ounce packaged Potato Gnocchi
-2 tbsp Butter
-1 cup Whipping Cream
-1/2 tsp Salt
-1/4 tsp Pepper
-1 tsp dried Basil or 1 tbsp fresh basil minced
-2 tbsp Dried Sun-Dried Tomatoes re-hyrdrated and minced
-1/2 cup freshly grated Parmesan Cheese

Cook gnocchi according to directions on package. Drain and set aside.

Heat a large saucepan over medium heat and melt the 2 tbsp of butter. Once melted, add the cream, salt and pepper. Stir to combine and bring the sauce to a boil, then reduce heat. Stir frequently while the sauce gently boils and thickens for 3-5 minutes. Add the basil and sun-dried tomatoes to the thickened sauce and heat through for 1 minute over low heat. Remove the saucepan from heat and stir in the 1/2 cup freshly grated parmesan cheese. Place the gnoochi on a serving dish and pour the sauce over top. Enjoy!

Recipe Inspired & Adapted By: The Granary & Anyone Can Cook

Monday, June 10, 2013

Dobie Love: 2 Weeks with Duke

I'm going to apologize in advance. Actually, I'm not going to apologize, I'm going to warn you. For the next 10-15 years every aspect of The Girly Girl Cooks (Twitter, Instagram & Facebook) is going to be flooded with pictures and posts featuring my new baby pup.


Duke has brought so much joy into our lives. In fact, we can't imagine life without our ginormous puppy. Living in a small town, Duke has easily become the town celebrity in just 2 weeks. I guess there aren't many doberman pinschers in a small farming community! Therefore, it has been both Dusty and my mission to take Duke around town and introduce him to everybody to break the doberman pinscher stereotype.

This is definitely the face of a killer. Right???

Duke is definitely a lover and not a fighter. He's a total momma's boy and everyone he encounters gets smothered in puppy kisses. He definitely is winning the hearts of the community. My favorite is when he encounters little kids. His little nubbin of a tail goes crazy and he attacks the kiddos with kisses. It makes a puppy momma's heart melt. 

One of the biggest adjustments to being a puppy parent is sleeping. Or should I say lack of sleeping? Duke wakes us up about 1-4 times a night. On a good night he will let us sleep 5-6 hours at a time and on the nights when he gets a chicken-liver puppy treat, he wakes me up every 1-1/2 hours (that was a really rough night!). Let it be known...Duke does not eat chicken-liver puppy treats anymore because it doesn't agree with his bowels and I need sleep. 

Giant puppy paw!

The greatest puppy parent achievement Dusty and I have accomplished so far is that we have pretty much mastered potty training with Duke! He hasn't had an accident since last Monday and it was most likely due to the pouring rain outside, and Duke is not a fan of doing business in the rain. 

Other than that, we have been accident free! At night when he needs to go to the bathroom he gives a little whimper from his crate and I let him outside. Then during the day he will go stand by the door and make a little noise to let me know he is ready for business. Such a smart pup! Now if we could just get over the teething stage. My jeans and sandals are getting waaay too much love from Duke. 

Another thing....Duke has the weirdest sleeping habits and will sleep on anything and everything. He likes to sleep on his doggie bed with his toys....


On the couch....

On our shoes???

And my personal favorite. 
This is usually how I find him asleep in his crate...
Such a goober!

As people who are losing sleep as it is with our new pup, Dusty and I were determined that Duke wouldn't sleep or be on our bed. It's fun and cute when he is a 17 pound puppy, but once he reaches 90-100 pounds there isn't going to be room for us in the bed! Well, as you can see, we gave in....
So now Duke can add this to his list of many places to sleep.
I am weak to those puppy eyes.


On Saturday Dusty and I took our once a month trip to the "big city" of Great Falls to stock up on home/food supplies. 25 pound bag of flour and rice for $9 each. Heck yes! We brought Duke with us and of course we had to take him to the city dog park.


Duke hasn't really had the opportunity to socialize with other dogs before, so we were anxious to see how a park with 20-30 dogs would go....

And it went wonderfully!

Duke and this one chocolate lab became best friends instantly. They were rolling around in the grass and slobbering all over each other. Then a german shepherd had to come check out the situation....and apparently Dukes situation too. Dogs....


One of Dukes favorite things to do at the park was to run back and forth to Dusty and I through a giant tunnel. He loved it!

After an hour or so of playing at the park, Duke was pooped out and hot. We drove over to Petco so he could pick out a special treat (because he isn't spoiled enough!). His first choice was this furry squeaky squirrel...
Can I pweaz haz it? I waz a good boy today!

Of course we bought the squirrel. How can you refuse those eyes and soft velvet ears??? On the way home he slept throughout the entire car ride like a good boy. He especially loved laying on his ice pack. I found these giant ice packs at the grocery store and they are perfect for keeping your pup cool on hot days in the car. 


On Tuesday Duke will be 9 weeks old. They grow up so fast!  Each Tuesday I'm going to weigh him and take a picture of him. It will be fun to see how fast he grows from week to week. In just one week, he had already gained 3 pounds, so I'm curious to see how much he gains this week. I'll keep you posted!

Thursday, June 6, 2013

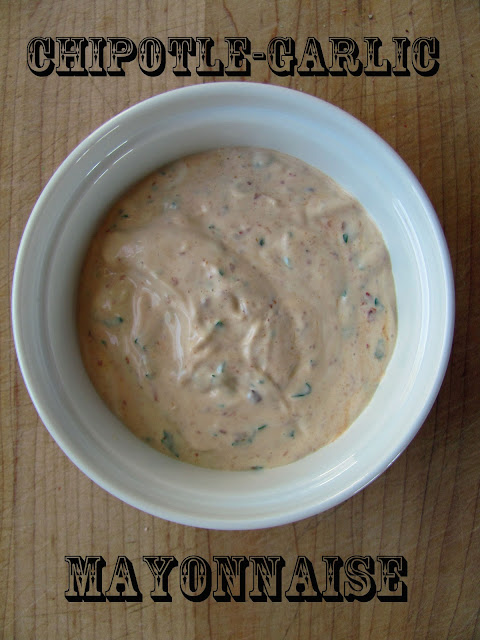
Chipotle-Garlic Mayonnaise

It's funny how over the years our taste buds evolve. I can distinctly remember eating plain white turkey breast and mashed potatoes as a young girl at Thanksgiving. How boring is that? I also remember ordering just a chicken taco with cheese and lettuce whenever we would go out for Mexican with my family too. Totally bland.

Now I've gotta have heat! I've gotta have flavor! The more flavor the better. I find myself mixing Frank's Red Hot Sauce and Tobasco on everything. I can't just have Ranch dressing anymore, I've gotta have it mixed with Frank's. Hashbrowns and eggs can't be left alone, they have to have dashes of Tobasco everywhere. It's become an addiction.

So of course through natural progression I had to move onto altering mayonnaise! Instead of just chopping up some chipotle peppers in adobo sauce and adding it to my mayo like I've seen in so many recipes, I took it up a notch and added some really fun flavors to make something really wonderful.

This mayonnaise is insanely good. I've been putting it on everything. I feel like that sassy old lady from the hysterical Frank's Red Hot sauce commercials who "puts that s*** on everything". You know what I'm talking about! I'm putting this mayo on everything. My sandwiches will never be the same. In fact, next week I'm going to use this flavor-packed mayo to show you how to make the ultimate grilled cheese. Get excited!

To make the Chipotle-Garlic Mayonnaise, it only takes 5 ingredients and less than 5 minutes! It just takes lemon juice, garlic, mayonnaise (the real stuff, not the fake nasty Miracle Whip), chipotle peppers in adobo sauce and parsley. 

Place all the ingredients in your mini-food processor...

And let it go for 5-10 seconds until it resembles this gorgeous creation!

That's it! Super simple and easy. The next step is to spread it on everything from your favorite sandwich (maybe not PBJ...that might be weird) to tacos, burgers and salads. Feel free to play around with the spiciness of this mayo. I find that 1 chipotle pepper per 1/2 cup mayo is perfect, but you can always add more or use less. It's up to you!

Chipotle-Garlic Mayonnaise
{1/2 cup}

-1/2 cup Mayonnaise
-1 tsp Lemon Juice
-1 clove Garlic
-2 tbsp Parsley
-1 Chipotle Pepper in Adobo Sauce (seeds removed)
-1 tsp Adobo Sauce from Chipotle Peppers

Combine all ingredients into a mini-food processor. Pulse ingredients for 5-10 seconds until combined. Place in an air-tight container and store for 7-10 days or serve immediately. 

Enjoy!
Related Posts Plugin for WordPress, Blogger...